Build Rhodes Application
This page describes how to build Rhodes Application on all of our supported platforms: iPhone, RIM Blackberry, Windows Mobile and Android.
- All Platforms Prerequisites
- Setting Up Rhodes Source Code
- Setting Up build.yml
- Building a Rhodes Application for iPhone/iPad
- Build for Android
- Build for BlackBerry
- Build for Symbian
- Build for Windows Mobile
- Build for Windows
- Build for Windows Phone 8
- How to set application name and icon
- Upgrade Application
All Platforms Prerequisites
Required Software
You should check to see that the required software in installed on your computer, such as Ruby and RubyGems. See the installation instructions.
Setting Up Rhodes Source Code
If you are planning to modify or extend Rhodes, you will need the Rhodes source code. It is distributed under MIT license. You don’t need the Rhodes source code if you are not planning to modify/extend Rhodes, and you should skip to the building section for your platform if this is the case.
Rhodes source code is available on github.com. You will need Git to get it. If you used RhoStudio for Windows you probably already have Git installed on your system. Otherwise, load it from here.
To clone Rhodes to your local computer, execute git clone from the command line:
$ git clone git://github.com/rhomobile/rhodes.git
$ cd rhodes
Checkout the branch you are interested in (if not the master branch):
$ git checkout -f -b <branchname> --track origin/<branchname>
To keep your branch up to date, use the git pull command:
$ git pull
Add the bin folder of this clone to your path. On Linux/Mac it is typically done in the .profile file. On Windows, it is done using the Control Panel.
Configure your environment by running the rhodes-setup script. This will attempt to auto-detect installed SDKs. It will prompt you to verify the SDK paths or enter paths for SDKs that cannot be detected.
$ rhodes-setup
You don’t have to do it if you installed RhoStudio, but if you want to build a Rhodes gem, do the following:
$ gem build rhodes.gemspec
$ gem install rhodes-[version].gem
Setting Up build.yml
By default, a Rhodes application uses the latest Rhodes gem installed on your computer. If you wish to use special version of Rhodes or use Rhodes git sources, check for this line in your application’s build.yml file:
sdk: /Library/Ruby/Gems/1.8/gems/rhodes-3.0.2
Or for Rhodes sources:
sdk: ~/Projects/rhodes
After you install a new Rhodes gem(3.2.x over any version less then 3.2.x), you need to go to the command line, navigate to the directory of your Rhodes application, and run the following command:
$ migrate-rhodes-app
The migrate-rhodes-app will update the sdk line from your build.yml to use the latest Rhodes gem. It will also upgrade your application’s Rakefile.
Building a Rhodes Application for iPhone/iPad
iPhone/iPad versions of Rhodes apps must be built on Macintosh computers or on rhohub.com. The instructions below describe how to do this from either the Macintosh Xcode development environment or from the command line on your local Macintosh.
Prerequisites
To build for iPhone/iPad using you will need the following software installed:
- Mac OS X 10.6 or greater.
- Follow All Platforms Prerequisites.
- XCode 4.2 or greater
- XCode Command Line Tools (already included in versions of XCode before 4.3) should be installed manually from XCode 4.3 - see Note below.
- iPhone SDK. We recommend installing the latest XCode with the latest iOS SDK (the latest XCode is already included with the iOS SDK). The latest stable version is available from the iPhone Dev Center.
In XCode 4.3, command line tools are not included in the installation. You should install the command line tools from XCode by using the Components tab of the Downloads preferences panel. See New Features in Xcode 4.3
Building and Running Your iOS Application with RhoStudio
To start the build process, create a Run Configuration: select your project in the Project Explorer, and do one of the following actions.
- Select Run->Run Configurations… from the main menu,
- Or right-click on your project, and select Run As->Run Configurations from the popup menu.

The Run Configurations window appears.
To run on the iOS simulator, select iPhone in Platform, Simulator in Simulator type, and select iPhone or iPad. Then click the Run button.

Build a Rhodes Application with Xcode
If you wish to run your Rhodes application on an iOS device, you need to build and run it using an Xcode project.
Tell Rhodes to build from your Rhodes application. Within your Rhodes project folder, run the following command:
$ rake switch_app
The switch_app command changes the rhobuild.yml in the Rhodes source code folder to point to your application, as in the following example for a Rhodes application named Store in the user’s home folder:
env:
  app: /Users/NameOfUser/Store
Note that the switch_app command is only used when you run a Rhodes application within an IDE, such as Xcode: you run switch_app for each Rhodes application that you run in Xcode. The switch_app command does not affect Rhodes applications that you build and run on the command line or within RhoStudio.
Now run the following command to tell Rhodes to set up the Xcode environment for your Rhodes application:
$ rake build:iphone:setup_xcode_project
Then in the Rhodes source code folder (the path in your Rhodes application build.yml file), navigate to the /platform/iphone folder and open rhorunner.xcodeproj. This will open your Rhodes application in Xcode.
In the Xcode Scheme menu, select the proper scheme before you build and run your project. Click on the Scheme menu.

Select the Scheme for your project under rhorunner. You can select to run in the simulator.

Now you can build and run in Xcode to run your project in the iOS simulator.
If you are an Apple developer, you can run your Rhodes application on your iOS device. In Xcode, select your rhorunner target, click on the Build Settings tab, and see that your code signing information that you installed as an Apple developer is set up and selected.

Plug in your iOS device. In Xcode, under Scheme, select iOS device under rhorunner. Then build and run.

For more information on running on your iOS device from Xcode, go to the Apple developer site, go to the iOS Developer Library, and search on “managing devices”, or “run applications on a device,” or similar.
You can edit your Rhodes code for your Rhodes application in a text editor, save your changes, do a Clean in Xcode so that your changes will register in Xcode, and then rebuild and run your project from Xcode.
The resulting application package (*.app) is located in your Rhodes source code folder under /platform/iphone/build/, in a folder named like [Debug/Release]-[iphoneos/iphonesimulator]/rhorunner.app.
Building and Run on devices before iPhone4 and iPad
From XCode 4.2 on, Apple removed default support of the armv6 architecture. In this case there are two issues.
Your distribution build should include code for both armv6 and armv7. The XCode projects included with Rhodes and used for build Rhodes-based application for iOS are already fixed for this.
If you want to build/run/debug your application on devices before iPhone4/iPad (for example, on iPhone 3G), you should manually path all your native extension xcode projects used in your application for Architecture settings. In your project, under Build Settings -> Architectures, click the Debug or Release row (depending on if you are debugging or releasing), and choose “Other”. In the pop-up box, modify as follows.
- Remove
$(ARCHS_STANDARD_32_BIT)and replace by typingarmv6. - Use the plus button to add a new row. Type
armv7. - Click Done.
Building and Releasing on App Store
Once you have the application building with Xcode as described above, it is treated as any other iPhone application when it comes to signing and distributing to the app store.
Restoring rhorunner.xcodeproj
To restore the Xcode rhorunner.xcodeproj to its original state:
$ rake build:iphone:restore_xcode_project
Building iPhone Application from the Command Line
Unlike building the application from the Xcode GUI, when you build the application from the command line, use the rake command from the directory of the application that you had just generated with rhogen.
From the command line, navigate to the folder for your Rhodes application.
To run your Rhodes application in the iPhone simulator, run this rake command:
$ rake run:iphone
Building the Application for the iOS Device
After you have modified and debugged your Rhodes application, you can prepare your application to install to your iOS device.
Modifying the build.yml
First, in your application’s build.yml file, change sdk to iphoneos instead of iphonesimulator, configuration to Release instead of Debug, and add information such as codesignidentity.
iphone:
    sdk: iphoneos4.3
    configuration: Release
    codesignidentity: "iPhone Developer"
    entitlements: ""
build.yml settings
The default build.yml settings generated for iphone are:
name: myapp
version: 1.0
iphone:
  provisionprofile:
  sdk: iphonesimulator3.0
  entitlements:
  codesignidentity:
  configuration: Debug
  emulator: 3.0
  emulatortarget: iphone
  BundleIdentifier: com.yourcompany.yourapp
  BundleURLScheme: yourapp
  entitlements_file: "./production/Entitlements.plist"
  production:
    app_plist_title: "myapp"
    app_plist_subtitle: "myapp"
    app_plist_icon_url: "www.yourcompany.com/icon.png"
    app_plist_ipa_url: "www.yourcompany.com/myapp.ipa"
    ipa_itunesartwork_image: "./production/image.jpg"
- name: name of your application. Will show on screen (iPhone application bundle display name)
- version: version of your application. iPhone application bundle version
- provisionprofile: The UUID of your provisioning profile to use when signing.
- sdk: The version of sdk used to build. Typically iphonesimulatorX.X or iphoneosX.X
- entitlements: propertylist file for entitlements for your build. Typically is Entitlements.plist
- codesignidentity: The name of the code signing identity to use when signing for device.
- configuration: Debug/Release/Distribution
- emulator: version of emulator for run application
- emulatortarget: device family for simulator (iphone/ipad)
- BundleIdentifier: bundle identifier - used in provisioning profile
- BundleURLScheme: bundle URL scheme of your app (used for opening your application from another application by using custom URL scheme)
- entitlements_file: path of your custom Entitlements.plist (if you want use own instead of default) - you also can just put Entitlements.plist file into root folder of your application and it will be automatically used during build
- production: section used only for Ad Hoc distribution, contain some specific options for prepare .plist and *.ipa files etc.
- app_plist_title: title in plist file (application name by default)
- app_plist_subtitle: subtitle in plist file (application name by default)
- app_plist_icon_url: icon url written in plist file
- app_plist_ipa_url: IPA file url written in plist file
- ipa_itunesartwork_image: path to iTunesArtwork image included into IPA file (must be 512x512 JPG image)
| BundleIdentifier and BundleURLScheme can contain only next symbols : "a"-"z", "A"-"Z", "0"-"9", "-", "." ! |
Here is an example of the iPhone settings in build.yml for a finished application:
name: JS App
version: 1.0
iphone:
  provisionprofile: E5931D39-CA68-48E4-A3AF-BB538E1C8CE6
  sdk: iphoneos4.2
  codesignidentity: "iPhone Developer: John Smith (MF99RW67WY)"
  entitlements: ""
  configuration: Release
  emulator: 4.2
  emulatortarget: ipad
  BundleIdentifier: com.johnsmithcompany.jsapp
  BundleURLScheme: jsapp
Creating Your Application Package
Now you can create your .app file with this rake command:
$ rake device:iphone:production
The package named your application name.app will be placed to <your application folder>/bin/target/iOS/[sdkname]/[configuration]/[your application name].app if you are using Rhodes from 2.2.4 version.
Result package named rhorunner.app will be placed to <sdk directory>/platform/iphone/build/[Debug/Release/Distribution]-[iphoneos/iphonesimulator]/rhorunner.app if you are using Rhodes before 2.2.4 version.
Installing Your Application Package to Your iOS Device
Use iTunes for installing your application package (your_application_name.app) to the iOS device:
- Open iTunes.
- Under Library, select Apps.
- Drag and drop your application package into the Apps screen.
- Connect your device to iTunes.
- Under Library, select your device.
- Select the Apps tab in your iTunes device screen.
- In the Sync Apps list, check your application.
- Perform a sync. Your application is installed to your device.
Build for Android
To build for Android it is required JDK 1.6 (JDK 1.7 is not supported).
Setting Up the Android SDK and NDK
Check that your OS is compatible with the Android SDK.
Download the Android SDK, and unzip it to the location of your choice.
On Macintosh and Linux, navigate to and run <Android SDK>/tools/android sdk. On Windows, navigate to and run
- Select Settings, then check “check `Force https://… sources to be fetched using http://”.
- Run Android SDK Manager, check latest Android SDK Platform(s) and Google APIs, then click “Install packages” button to download and install them.
To use Google Map View you need to install latest Google API from Android SDK Manager
Download and unzip the Android NDK to the location of your choice.
You need to update Android SDK platforms and Android NDK to latest ones as you update to new rhodes
In RhoStudio -> Preferences on the Macintosh or Windows -> Preferences on Windows, open Rhomobile->Android and set the paths to your Android SDK and NDK installations.

If you are not using RhoStudio, run rhodes-setup from the command line and set the paths to the Android SDK and NDK installations.
Setting up the Android Maps API
In case you are planning to work with native geo mapping (the MapView interface), you must do two things:
-
Retrieve the Android Maps API key from Google. Follow these instructions to get it. When key received, put it in your application’s
build.ymlor share it across all your applications by adding it torhobuild.yml. Note that theapikeyvalue must match a certificate used to sign an application (the key is different for debug and production signed build and debug key cannot be shared between different build computers).android: apikey: “GOOGLE-API-KEY-FOR-ANDROID”
-
Enable ‘mapping’ in your application’s
build.yml(or in<rhodes-root>/rhobuild.yml). In RhoStudio, you can double-click on your application’s build.yml and edit from the text editor; otherwise, you can edit rhobuild.yml or build.yml from another text editor.android: mapping: yes
Including CSS Files
You should check your application to change how you include css files in your html pages.
For example, you will need to replace this:
<style type="text/css" media="screen">
    @import "/public/js/iui/iui.css"; @import "/public/css/rho.css";
</style>
with this:
<link rel="stylesheet" href="public/js/iui/iui.css" type="text/css">
<link rel="stylesheet" href="public/css/rho.css" type="text/css">
Otherwise your css files will not be loaded in Android 1.5 (and higher).
Device capabilities settings in build.yml
On Android, you must specify your device capabilities the your application will use. By default, these capabilities are NOT enabled.
In RhoStudio, you can double-click on your application’s build.yml file, then click the Rhobuild setting tab, then click the Capabilities: Add button. You will see a list of capabilities you can check to activate for your application.

You can also edit the build.yml file directly with a text editor. Here is a list of capabilities you can add to the capabilities section in your application build.yml file.
audio
camera
gps
network_state
phone
pim
record_audio
vibrate
bluetooth
calendar
sdcard
push
hardware_acceleration
Set up minimal Android SDK API level
The minimal API level supported by Rhodes is 4 (Android 1.6) You can set a greater minimal API level in build.yml. For example, the following entry will restrict installing your application on any Android OS prior to 3.0:
android: minSDK: 11
Customizing application’s AndroidManifest.xml
If you have an urgent need to put changes in AndroidManifest.xml that are not supported by build settings, you may edit a manifest template located at
To see how to change AndroidManifest.xml at extension build, see Extending the Rhodes Framework.
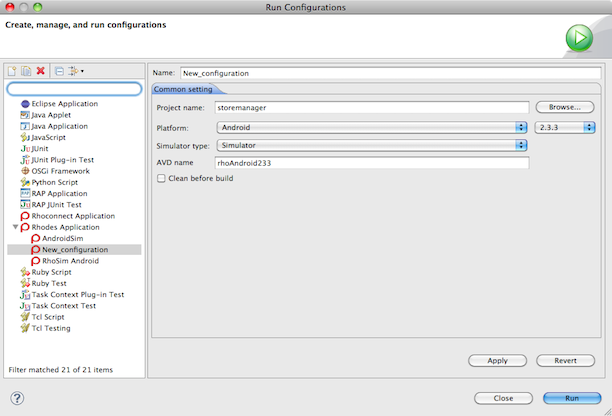
Building and Running Your Android Application with RhoStudio
To start the build process, create a Run Configuration: select your project in the Project Explorer, and either: * select Run->Run Configurations… from the main menu, * or right-click on your project, and select Run As->Run Configurations from the popup menu.
The Run Configurations window appears.
Running on the Android Simulator with RhoStudio
To run on the Android simulator, select Android in Platform, Simulator in Simulator type, and enter the name of the AVD in AVD name. Then click the Run button.
You can get a list of the AVD names by running the SDK setup: on Macintosh and Linux, navigate to and run

Running on an Android Device with RhoStudio
To run on an Android device, first set up your device as shown in the Android documentation for Using Hardware Devices.
Then connect your Android device to your computer with a USB cable.
In the Run Configurations window, select Android in Platform, and Device in Simulator type.
Reading the Log File with RhoStudio
After you run your application in RhoStudio, your application log file, rholog.txt, is stored in your application directory. You can open and read rholog.txt in RhoStudio by double-clicking on it in the Project Explorer.
Building and Running Your Android Application from the Command Line
From the command line, navigate to your application directory.
To run your application in the Android emulator, run the following command:
$ rake run:android
You can adjust the settings of the Android emulator from your application’s build.yml file. For example, to specify the platform version number and the emulator AVD name:
android:
  version: 2.1
  emulator: myDeviceEmulator20
You can also disable the Android title in the application and set the orientation to portrait (or landscape):
android:
  android_title: 0
  orientation: portrait
If the rake command gets stuck, you can kill the command window, open another window, and run:
$ adb start-server
$ rake run:android
If you didn’t run your Android simulator yet or don’t have AVD configuration set, you will be asked a few questions about emulator configuration. You should answer “yes” for most questions or use default answers. As a result new AVD configuration will be created.
To uninstall your application from the emulator, run:
$ rake uninstall:android
To run on an Android device, first set up your device as shown in the Android documentation for Using Hardware Devices.
Connect your Android to your computer with a USB cable. You can verify that your device is connected by executing:
$ adb devices
If connected, you’ll see the device name listed. If your computer doesn’t see the device, try killing the adb process first:
$ adb kill-server
$ adb install <filename>.apk
After you have your device connected, navigate to your application directory and run:
$ rake run:android:device
This will build your application and sign it with auto-generated self-signed certificate.
To uninstall your application from the device, run:
$ rake uninstall:android:device
Getting the Application Log from Device or Emulator
You can get the application log from the device or the emulator. From the command line, navigate to your application folder or to the root of your rhodes source tree (where the rhobuild.yml file is located). Then run this command:
$ rake device:android:getlog
Or :::term $ rake emulator:android:getlog
The application log will be stored in your application directory. The file will be named RhoLog.txt.
To see all the emulator messages, run adb logcat and start the application in the emulator.
To see all the device messages, run adb -d logcat and start the application on your device.
Building an Android Production Version
To build a production version of your application, edit your application’s build.yml as below:
android:
  production:
    certificate: path/to/your/developer/certificate
    password: "password-of-the-certificate"
    alias: "keystore.alias"
This will use the specified certificate to sign your application. If the certificate is not found, it will be auto-generated, and you’ll be prompted with several questions like your name, organization etc. The path to the certificate may be absolute or relative to your app directory. If you don’t want to use an auto-generated certificate, refer to the these instructions on how to create a certificate manually.
Once your certificate is set up, you can run:
$ rake device:android:production
The signed APK will be located in <rhodes-app-dir>/bin/target. To install the application on the device run:
$ adb -d install -r <rhodes-app-dir>/bin/target/<app-name>_signed.apk
Building app in Eclipse
On Macintosh and Windows computers, you can create Rhodes apps within RhoStudio. However, on Linux installations, you can use Eclipse, since RhoStudio is not available for Linux.
Please note: It is only Google API target (with Google mapping API) supported for Eclipse.
Create a new workspace in the following directory: <Rhodes>/platform/android
In Eclipse, open Window > Preferences.
Click on Android node in the tree and specify the file path to the installed Android SDK (for example: E:\android\android-sdk).
Import all projects from the directory for your new workspace: <Rhodes>/platform/android
If you have set the option to build sources automatically, your project will be compiled just after the import.
Select Properties from the Rhodes project context menu and select one of the latest Google API targets for Android.
Check the bin directory. You should see the Rhodes.apk file that was created. It will be signed with the debug key provided with SDK.
Now you are ready to install your application on your device and/or emulator.
In case of troubles in Eclipse while setting up the Android SDK and target, try “Rhodes project context menu” > “Android Tools” > “Fix Project Properties”.
It is possible your application has stopped unexpectedly just after the first build. In this case try to copy auto-generated java source files from the application folder
Getting application log from device or emulator
To get application log from device or emulator, from your application folder or from root of rhodes source tree (place where rhobuild.yml is located), issue command:
$ rake device:android:getlog
Or :::term $ rake emulator:android:getlog
Application log will be pulled from device/emulator and stored in your application directory with name RhoLog.txt.
To see all emulator messages, run ‘adb logcat’ and start application on emulator.
To see all device messages, run ‘adb -d logcat’ and start application on device.
Build for BlackBerry
Blackberry SDK for Mac doesn’t come with simulators so far. So for now we would assume you are using Windows to develop for BB.
Prerequisites
- Follow All Platforms Prerequisites
- Load and install Blackberry JDE version 4.6.0 or higher (5.0 or higher recommended for simulator usage) from BlackBerry Java Development Environment. Click here for the latest Blackberry JDE. Registration may be required.
-
Run ‘rhodes-setup’ to specify Blackberry JDE paths or edit
/rhobuild.yml manually: env: paths: 5.0: jde: <jde_5.0>/components sim: 9550 #sim_path is optional. It defines path for standalone simulator sim_path: <jde_5.0>/components/simulator mds: <jde_5.0>/components/MDS Read about Blackberry Browser limitations of CSS, HTML, and JavaScript. You can search relevant documentation from the documentation for the current Blackberry Java SDK and the previous Blackberry Java SDKs.
- You may need to install the MDS simulator; you can download it from BlackBerry Simulators.
Build application using rhodes gem
Before you build edit build.yml from the application directory. Set the bbver to the target BB OS that you are building for. For example:
bbver: 5.0
To build and run using Blackberry simulator 5.0 and higher
Starting from Blackberry JDE 5.0, the Blackberry simulator supports loading application code-files to simulator without restart. This feature greatly improves Blackberry development performance. There are 2 possible scenarios available:
-
Load application cod-file manually using Simulator menu: ‘File\Load Blackberry application or theme…’: $ rake run:bb:startsim $ rake package:bb:production_sim
In simulator window open menu: ‘File\Load Blackberry application or theme…’ and choose app cod-file:‘
/bin/target/ /<app_name.cod>’ After application modification: $ rake package:bb:production_sim And reload application cod-file in simulator using menu.
-
Use rake commands to reload app on simulator.
$ rake run:bbapp
Start application on simulator and DO NOT close application in simulator. After application modification: $ rake run:bbapp
In case of simulator errors:
- Try load application cod-file manually.
- Try to uninstall application: select application icon on simulator and press Menu\Delete
- Close simulator and run clean.bat in simulator folder
To build and run using Blackberry simulator
Run in application root directory:
$ rake run:bb
Launch application from the simulator’s Downloads menu item for 4.6 or from Main menu screen on 4.3 and below. Do not close the Simulator manually after you are done testing. Script will restart simulator for you.
Modify your application and run run rake script again:
$ rake run:bb
To see application log change log settings in rhoconfig.txt. Run your application and see log file at <simulator folder>\sdcard\rho\<app_name>\RhoLog.txt
To switch log on while running your application select menu\log\options form the application menu and set log level to Info and Message classes to APP or to *.
To clean all data (database and log) go to ‘
Some known issues while building for BB simulator
Run rake config:checkbb and see are any problems reported
Run rake scripts from windows console. Do not use bash or similar tools.
When emulator starts, open Blackberry Internet Browser and browse for some web site. If you are unable to browse:
- check that MDS is running - it should be console window started with emulator.
- open manage connection (blackberry menu button)\check Mobile Network
Check your JAVA_HOME environment variable: it should NOT contain ‘bin’ at the end.
Do not use ‘localhost’ or ‘127.0.0.0’ for sync server address if you host sync server on your machine. Use local computer name instead.
To build application for the device
You have to sign your application before loading it to your device. To do so, go to BlackBerry set up for signing smartphone apps for instructions to request and register code signing keys.
If your target device is Blackberry JDK 4.3 and later, you can provide password in the rhobuild.yml file (located in the Rhodes SDK folder) in the ‘build’ section:
build:
  bbsignpwd: <password>
Run:
$ rake device:bb:production
Built application will be available at <application_directory>/bin/target. For example, if you rake:bb:production, the files will be in a directory named for the SDK version, like /bin/target/4.6/ota-web. You should see many .cod files and a single .jad file.
You may deploy it to the device now. To do that upload .jad and all .cod files to a web server, then open the .jad file from the browser on your blackberry device. You may use rhohub.com Gallery feature to host your builds as well.
Some known issues while building for BB device
After you get your CSI-file from Blackberry, you have to register them. If after dbl-click you will see message “Already registered” see instructions here: Incorrect password error when attempting to register signature keys.
After press Yes in dialog ‘Would you like to create a new key pair file’ - nothing appear. No dialogs, no error messages, just nothing then this is a problem with Java SDK and Blackberry SDK versions. See more information here:
- The signature key window disappears after receiving the private key prompt
- Supported versions of Java for different BlackBerry JDE versions
If you still have a problems then manually register CSI files
Signature files can be only registered once per computer. If you register them for example in 4.6 Blackberry SDK , you can copy sigtool.csk and sigtool.db to bin directory of any other BB SDK
There is a problem with network on BlackBerry simulators under Windows 7. It causes syncing failure. There are two workarounds for this issue. One is to use MDS for network connection in simulator (build script does this automatically). The second workaround is to emulate WiFi connection in the simulator.
Application log on the device
The log is written to the file ‘rholog.txt’:
- If your device has SD card log will place to
<Media Card>\Rho\<app name>folder. - If your device doesn’t have SD card log will place to
<Device Memory>\home\user\rho\<app name>.
To see or copy log file to your computer:
- Add menu item Log to your application menu
- Call
RhoConf.show_logorRhoConf.send_logsomewhere in your app (for example on the settings page) - Open Media application on the Phone, select Menu\explore. You can view log file or send it via bluetooth
- If you have SD card: Phone options\memory\Mass storage support - ON, save. Then connect device to the computer via cable and you will see USB disk drive in computer explorer. Copy
rholog.txtto computer.
Do not forget to turn ‘Mass Storage support’ OFF, otherwise Rhodes wouldn’t be able write to the files!
Connectivity on the device
If your phone has Wifi connectivity Rhodes will use it without any additional efforts. In case of GPRS, you should :
- Setup mobile network: Phone Options\Mobile Network\Data Services ON, Connection preferences: Should be not WiFi-Only.
- Setup APN address: Phone Options\Advanced settings\TCP/IP/APN settings enabled. APN should address specific for your provider (wap.cingular for example).
Event log from device
Read Blackberry article on how to enable, access, and extract the event logs on a BlackBerry smartphone.
Now you should be able to extract a full copy of BlackBerry smartphone event logs to a text file using loader.exe on a computer.
Connect the BlackBerry smartphone to the computer using a USB cable.
Open the command prompt and type:
$ cd c:\Program Files\Common Files\Research In Motion\AppLoader
On a 64-bit system, type:
$ cd c:\Program Files (x86)\Common Files\Research In Motion\AppLoader
Type:
$ Loader.exe /eventlog c:\log.txt
The log.txt file is the extracted log and should appear on the C:\ drive.
To obtain the Loader.exe tool, install BlackBerry® Desktop Manager 4.7 or later, or visit http://na.blackberry.com/eng/update/ to check for updates for the BlackBerry smartphone that will install the necessary components to your computer.
On some Windows Vista™ and Windows® 7 computers, even though c:\ was specified, the Java Event logs might be saved to the following location:
c:\Users\<username>\AppData\Local\VirtualStore\Program Files\Research In Motion\BlackBerry\Apploader
Build rhodes from the source code using Eclipse
- You should have Blackberry Eclipse IDE installed.
- Please make sure that there are no .metadata folder in rhodes\platform\bb folder.
-
Go to
<rhodescheckout>and run:$ rake build:bb:devrhobundle
Run eclipse and choose rhodes\platform\bb as a workspace directory. Do not create workspace!
- Open menu Window\Preferences
- Blackberry java plug-in\Warnings - check all 3 checkboxes to suppress all warnings
- Java\Compiler - set Compiler compliance level to 1.4
- Go to File\Import… menu. Select
General\Existing projects into Workspaceworkspace node. Press Next.- Browse for
<rhodes>\platform\bb\RubyVM. Press Finish. The project will be automatically build. - Browse for
<rhodes>\platform\bb\Hsqldb. Press Finish. The project will be automatically build. - Browse for
<rhodes>\platform\bb\Rhodes. Press Finish. The project will be automatically build.
- Browse for
- Go to Run\Debug Configurations - double click on Blackberry simulator
- select all projects in Projects tab
- got to Simulator tab, select Memory, check Use PC file system for SDCard files, add
Rhoto PC file system for SDCard files edit box - Press Debug
Congratulations! It is all done.
Known issues with Eclipse build
Sometime BB Eclipse project is checked in in a wrong state and wouldn’t build correctly after loading:
- You need to make sure every sub-project is activated for BlackBerry: right-click on the sub-project and select
Activate for BlackBerrymenu item. - Check and set project dependencies correctly: select
Project/Properties...menu and navigate to BlackBerry Project Dependencies…. Set following dependencies:- PersLite doesn’t have any dependencies
- PersImplJSR75 depends on PersLite
- RhoBundle depends on RubyVM
- RubyVM doesn’t have any dependencies
- rhodes depends on PersLite, PersImplJSR75, RhoBundle, RubyVM
Rebuilding After Code Changes
Go to <rhodescheckout> and run:
$ rake build:bb:rhobundle
It should re-create rhodes\platform\bb\RhoBundle\RhoBundle.jar
Right click on RhoBundle project in Eclipse and select Refresh. It should rebuild rhodes and RhoBundle. You can see messages in Builder Console. OR Just Clean all projects.
Eclipse simulator debug instructions
Open Debug\Open debug dialog... from toolbar (small bug icons). Dbl-click on Blackberry simulator node.
Go to Simulator page and choose Profile other than Default. Check ‘Launch Mobile Data System Connection service with simulator’ checkbox.
you may have to install MDS on your computer if it is not installed.
Press Debug button. Simulator starts. Eclipse may ask you about missing debug files, press ‘Don’t ask me again button’.
You can also clean emulator and start emulator again:
$ run <JDE_HOME>\simulator\clean.bat
Press Menu button on emulator. Go to Downloads, run Rhodes
Build for Symbian
Symbian support is discontinued.
Note that Symbian versions of your Rhodes app must be built in a Windows environment.
Prerequisites
- Follow All Platforms Prerequisites
- Visual Studio 2005 Service Pack 1 installed
- Qt 4.7 SDK
If you want to build for Symbian device you have to install QT and QT Mobility for Symbian on your device. You can find installation files in QT SDK folder like below:
    For Symbian 9.4

    QT - C:/QtSDK/Symbian/sis/Symbian1/Qt/4.7.3/qt.sis
    (install it only on disc C:, before install please close all open applications)

    QT WebKit - C:/QtSDK/Symbian/sis/Symbian1/Qt/4.7.3/qtwebkit.sis
    QT Mobility - C:/QtSDK/Symbian/sis/Symbian1/QtMobility/1.1.3/qtmobility.sis

    For Symbian 9.5

    QT - C:/QtSDK/Symbian/sis/Symbian3/Qt/4.7.3/qt.sis
    (install it only on disc C:, before install pls close all opened applications)

    QT WebKit - C:/QtSDK/Symbian/sis/Symbian3/Qt/4.7.3/qtwebkit.sis
    QT Mobility - C:/QtSDK/Symbian/sis/Symbian3/QtMobility/1.1.3/qtmobility.sis
Then open file - C:/QtSDK/Symbian/SDKs/Symbian1Qt473/epoc32/include/cntdb.h and replace below two strings: CContactConverter& CContactDatabase::ConverterL(const TUid& aFormat); CContactConverter& CContactDatabase::ConverterL(const TUid& aFormat, const TInt64 aContactFieldFilter, MConverterCallBack aCallback, const TVCardVersion aVersion,const TBool aExportTel); with these strings: CContactConverter& ConverterL(const TUid& aFormat); CContactConverter& ConverterL(const TUid& aFormat, const TInt64 aContactFieldFilter, MConverterCallBack aCallback, const TVCardVersion aVersion,const TBool aExportTel);
| You have to install Rhodes on the same local disk with QtSDK! |
Build application from the command line
Add paths to Qt SDK and MS Visual Studio 2005 to rhobuild.yml in the Rhodes folder:
    env:
      paths:
        qtsymbian-sdk: C:/QtSDK
        msvs2005: C:/Program Files/Microsoft Visual Studio 8
To build and run application on emulator(Visual Studio 2005 only) :
$ rake run:symbian
To build application sis-file for the device:
$ rake device:symbian:production
| This command creates two sis-files: signed for testing and unsigned for production signing. See |
To clean all binaries run:
$ rake clean:symbian
| If the clean rake task doesn't respond long time while it is being executed then stop it and delete folder like this: C:/QtSDK/Symbian/SDKs/Symbian1Qt473/epoc32/BUILD/.../rhodes |
| If You want to use your own UID for application you can redefine it in build.yml. You can find information about UID here - http://www.developer.nokia.com/Community/Wiki/UID_Q&As_(Symbian_Signed) |
Build for Windows Mobile
Note that Windows Mobile versions of your Rhodes application must be built in a Windows environment.
Prerequisites
Follow All Platforms Prerequisites.
Make sure you have installed the following software.
- .NET Compact Framework
- For Windows Mobile 6: Windows Mobile 6 Professional SDK Refresh
- For Windows Mobile 6.5.3: Windows Mobile 6.5.3 Professional DTK
- For Windows CE 5.0: MC3000c50b PSDK from Zebra Support Central
- Microsoft Active Sync 4.5 for Windows XP; Windows Mobile Device Center for Windows Vista or higher
- Microsoft Device Emulator 3.0 for Windows Vista or higher
- Visual Studio 2008.
- Software for unzipping a zip file, such as 7-zip
| It is a good idea to install Windows Mobile 6 Professional last, since it needs to be installed after Visual Studio, and since the Windows Mobile 6 Professional install process will tell you if you forgot to install any of the other prerequisites. |
Allow DMA Connections
On Windows XP, open ActiveSync and open the File menu; on Windows Vista and above, open Windows Mobile Device Center and click Mobile Device Settings.
Select Connection Settings, then select the checkbox “Allow connections to one of the following.”
Select “DMA” from the list box. DMA Connection is required to work with the Windows Mobile emulator.
Debugging on Windows Mobile devices connected to PC
On Windows Vista and Windows 7 the Windows Mobile Device Center (WMDC) may start automatically upon connection of the WM device. If it is not happening, then you’re lucky and most probably you wouldn’t need to do anything to be able to run and debug rhodes application on the device while it is connected to PC.
The problem is that WMDC locks the file system of the mobile device and prevents rhodes application from running (because the application usually writes data to files located within the application folder). So if WMDC is starting when you connect the device to PC, you need to shutdown WMDC completely to be able to run rhodes application on Windows Mobile device.
To shutdown WMDC open the Task Manager, find wmdc.exe (Windows Device Mobile Center) and WmdHost.exe (Windows Mobile Device Center Sync Host) processes and end them.
Then disconnect the device and connect it again to PC – WMDC should not appear this time. Now you may run and debug rhodes applications on Windows Mobile devices connected to PC from both RhoStudio and command line.
Add Paths to Cab Wizard and Visual Studio
In RhoStudio Windows -> Preferences, right-click on Rhomobile->Windows Mobile to show the rhobuild.yml preferences. Check that the Cab wizard path (which is contained in your Windows Mobile 6 SDK program installation) is correct.

Also check that the vcbuild path is shown in the rhobuild.yml file. The rhobuild.yml file is located in the Rhodes folder (example location: C:/RhoStudio/ruby/lib/ruby/gems/1.8/gems/rhodes-3.1.1).
env:
  paths:
    vcbuild: C:/Program Files/Microsoft Visual Studio 9.0/VC/vcpackages/vcbuild.exe
    cabwiz: C:/Program Files/Windows Mobile 6 SDK/Tools/CabWiz
On 64-bit installations:
env:
  paths:
    vcbuild: C:/Program Files (x86)/Microsoft Visual Studio 9.0/VC/vcpackages/vcbuild.exe
    cabwiz: C:/Program Files (x86)/Windows Mobile 6 SDK/Tools/CabWiz
Setup target SDK and emulator
By default ‘Windows Mobile 6 Professional SDK (ARMV4I)’ SDK and “Windows Mobile 6 Professional Emulator” are used. To change edit build.yml:
wm:
  sdk: <target_sdk>
  emulator: <target_emulator>
-
‘target_sdk’ may be:
“MC3000c50b (ARMV4I)” - for Zebra CE devices. Install MC3000c50b PSDK from Symbol support site
“Windows Mobile 6.5.3 Professional DTK (ARMV4I)” for latest Windows Mobile SDK.
‘target_emulator’ may be: “Windows Mobile 6.5.3 Professional VGA Emulator” for VGA emulator , or any other installed Windows Mobile emulator
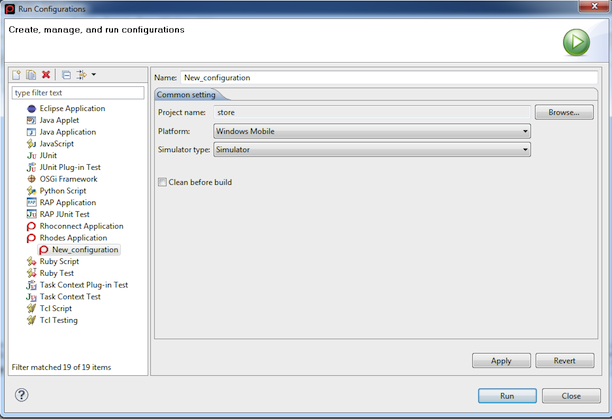
Building and Running Your Windows Mobile Application with RhoStudio
To start the build process, create a Run Configuration: select your project in the Project Explorer, and either: * select Run->Run Configurations… from the main menu, * or right-click on your project, and select Run As->Run Configurations from the popup menu.
The Run Configurations window appears.
In the RhoStudio Run Configurations window, when you choose the Windows Mobile platform and any of the platform types (such as 6.0, 6.5.3, CE5.0), this platform setting overrides the SDK settings for Windows Mobile in the application build.yml file. This override does NOT affect RhoMobile Production Build, or using rake (without RhoStudio) to build and run a Windows Mobile app; these options use the Windows Mobile SDK settings in the build.yml file.
Running on the Windows Mobile Simulator in RhoStudio
To run on the Windows Mobile simulator, select Windows Mobile in Platform and Simulator in Simulator type. Then click the Run button.
Running on a Windows Mobile Device in RhoStudio
To run on a Windows Mobile device, connect your device to your computer with a USB cable.
In the Run Configurations window, select Windows Mobile in Platform, and Device in Simulator type.
Build and Run from the Command Line
On computers without RhoStudio, you can build and run from the command line.
Navigate to your Rhodes application directory. To build and run application on emulator, run:
$ rake run:wm
To build cab-file, install it, and run application on emulator, run:
$ rake run:wm:cab
Before you install the application on your Windows Mobile device, first connect your device via USB cable. Then check that your device is connected with ActiveSync on Windows XP or with Windows Mobile Device Center on Windows Vista or above.
Navigate to your Rhodes application directory. To build and run application on device, run:
$ rake run:wm:device
To build cab-file, install it, and run application on device, run:
$ rake run:wm:device:cab
After the build process completes, the device will ask you to install the app. Disconnect the USB cable from the device before you install.
Build application cab-file for the device
$ rake device:wm:production
If you want the application to be signed automatically during the build process, please add the ‘wmsign’ key with full path to your code signing certificate to the ‘build’ section of rhobuild.yml file:
wmsign: <disk:/path/MySign.pfx>
You can find more information about Windows Mobile code signing at: http://msdn.microsoft.com/en-us/windowsmobile/dd569132.aspx
Deploy application on device
First, connect your device to your computer. You can use USB-cable, bluetooth or any other method. To use computer internet, start ActiveSync or Windows Mobile Device Center.
You can use rake tasks to deploy the application. See the previous section, ‘Build application from the command line.’ The device should be connected via USB-cable.
Manually copy the .cab file to the device. For example, you can use the device File Explorer to display the .cab file that is on the computer. Click on that .cab file and the installation process will be started; after it is finished, you should see the app icon on your device in Programs.
Build from Visual Studio IDE
Checkout the rhodes source code from github (you have this source code already if you installed RhoStudio).
Open <source-code-root>\platform\wm\rhodes.sln in Visual Studio (example location for C:/RhoStudio/ruby/lib/ruby/gems/1.8/gems/rhodes-3.1.1).
In Visual Studio, select Windows Mobile 6 Professional and build Release configuration.
Edit the file rhobuild.yml in the Rhodes folder:
- Check that the path to Cabwiz is defined, for example,
C:/Program Files/Windows Mobile 6 SDK/Tools/CabWiz. - Define the path to your application folder.
Run
$ rake build:wm:devrhobundle
Make sure you cradle your emulator (menu Tools/Device Emulator Manager/Select Running Emulator/Actions/Cradle)
Copy rhodes.exe and rhobundle (located at <source-code-root>\platform\wm\bin\win32\rhodes\Debug\rho) created at the previous step to the device: My Computer\Mobile Device and folder in Program Files on that device (for example, \Program Files\rhodes). You can first delete the contents of \Program Files\rhodes\rho folder on your device if you want to ensure there are no old files left over.
If you changed your application, then recompile your application code by running the following command again, and copying rhobundle and rhodes.exe again:
$ rake build:wm:devrhobundle
If you changed your application and built it using rake tasks, then to compile your application:
$ rake device:wm
Copy <your_app_directory>\bin\target\rhodes.cab content to \My Documents\ on your device or the emulator, execute that .cab to install the app, and then run the installed app to see the changes.
Logging
To read the log file from the emulator or your device:
- Connect to the device or emulator using ActiveSync or Windows Mobile Device Center.
- Press explore on ActiveSync window, File Management on Windows Mobile Device Center.
- Navigate to
My Device\Program Files\<your_app_name>\rho\rholog.txt
Build for Windows
Prerequisites
- Follow All Platforms Prerequisites
- Visual Studio 2008
- Install Qt libraries 4.7.4 for Visual Studio 2008 (235 MB)
- Create new (or update existing) system environment variable
QTDIRand make sure it points to root folder of the installed Qt libraries, e.g.C:\Qt\4.7.4 - Add
binfolder of installed Qt libraries, e.g.C:\Qt\4.7.4\bin, toPATHsystem environment variable
| If your application uses HTTPS protocol, then you need to build Qt libraries with OpenSSL (see [instructions below](#build-for-windows-https)). |
Build application from the command line
Make sure that path to vcbuild.exe (something like C:\Program Files\Microsoft Visual Studio 9.0\VC\vcpackages) is in your PATH env variable.
The list of paths which should be in PATH env variable: C:\Program Files\Microsoft Visual Studio 9.0\Common7\IDE;C:\Program Files\Microsoft Visual Studio 9.0\VC\BIN;C:\Program Files\Microsoft Visual Studio 9.0\Common7\Tools;C:\Program Files\Microsoft Visual Studio 9.0\Common7\Tools\bin;C:\Program Files\Microsoft Visual Studio 9.0\VC\PlatformSDK\bin;C:\Program Files\Microsoft Visual Studio 9.0\SDK\v3.5\bin
Also check that the vcbuild path is shown in the rhobuild.yml file. The rhobuild.yml file is located in the Rhodes folder (example location: C:/RhoStudio/ruby/lib/ruby/gems/1.8/gems/rhodes-3.1.1).
If you use Visual Studio 2008 :
env:
  paths:
    vcbuild: C:/Program Files/Microsoft Visual Studio 9.0/VC/vcpackages/vcbuild.exe
If you use Visual Studio 2008 on 64-bit installations:
env:
  paths:
    vcbuild: C:/Program Files (x86)/Microsoft Visual Studio 9.0/VC/vcpackages/vcbuild.exe
If you use Visual Studio 2010 : add path to msbuild to rhobuild.yml in rhodes folder:
env:
  paths:
    vcbuild: msbuild
To build and run the application issue command:
$ rake run:win32
*
To use rake run:win32 command, add to the PATH variable: <path-to-rhodes>\lib\extensions\openssl.so\ext\win32\bin
|
To clean all temporary and binary files execute command:
$ rake clean:win32
Create application installer for Windows
Download NSIS installer tool.
Add path to NSIS complier to ‘rhobuild.yml’ in rhodes folder:
On 32-bit platform:
env:
  paths:
    nsis: C:/Program Files/NSIS/makensis.exe
On 64-bit platform:
env:
  paths:
    nsis: C:/Program Files (x86)/NSIS/makensis.exe
Readme, license and icon
- Application License can be provided by application developer. If file with LICENSE.txt name exists in the root of application folder when Installer will display separate page to confirm the license.
- Application Readme file can be provided by application developer. If file with README.html name exists in the root of application folder when Installer will display show readme at the final page of the Installer
- Application Icon should be used for Installer and application exe
To build installer bundle use command:
$ rake device:win32:production
After the build process is finished you can find the installer bundle named <application-name>-setup.exe in <application-root>/bin/target/win32 folder.
Logging
Rholog.txt is placed in <rhodes folder>\platform\wm\bin\win32\rhodes\Debug\rho
How to enable HTTPS protocol
If your application needs HTTPS, then you need to build the Qt libraries for Visual Studio 2008 with OpenSSL as described below:
- Download the Qt 4.7.4 source (237 MB) and extract the archive, e.g. into
C:\Qt\4.7.4-src - Open Control Panel » System » Advanced system settings » Environment Variables and then:
- Create new (or update existing) system variable
QTDIR=C:\Qt\4.7.4(this will be the installation folder for the compiled Qt libraries) - Add to the
PATHvariable:C:\Qt\4.7.4\bin(it doesn’t matter that this folder does not exist yet) - To make command ‘rake run:win32’ work - Add to the
PATHvariable:<path-to-rhodes>\lib\extensions\openssl.so\ext\win32\bin - Either close all command prompts and Visual Studio instances, or reboot the computer so the new settings take effect.
- Create new (or update existing) system variable
-
Open Visual Studio 2008 Command Prompt. This is accomplished using Start » All Programs » Microsoft Visual Studio 2008 » Visual Studio Tools » Visual Studio 2008 Command Prompt. Run in Visual Studio 2008 Command Prompt:
  > vcvarsall.bat x86
  > C:
-
To build Qt library run in the same command prompt:
  > cd \Qt\4.7.4-src
  > configure -opensource -platform win32-msvc2008
    -nomake examples -nomake demos -nomake docs
    -qt-libpng -qt-libjpeg -qt-libtiff -qt-libmng -qt-gif
    -openssl-linked -no-qt3support -prefix C:/Qt/4.7.4
    -I <path-to-rhodes>/lib/extensions/openssl.so/ext/win32/include
    -L <path-to-rhodes>/lib/extensions/openssl.so/ext/win32/lib
  > nmake
  > nmake install
  > nmake clean
Be aware that it will take a while to build the Qt libraries from sources (maybe few hours or so). Particularly the
configurecommand may run for a few minutes, and thenmakecommand may run for a few hours. - After the build process is completed exit Visual Studio 2008 Command Prompt
Now when you build your application the usual way, the HTTPS protocol support will be enabled automatically.
Build for Windows Phone 8
Prerequisites
- Follow All Platforms Prerequisites
- Windows 8 OS
-
Visual Studio 2012 installed or VS Express 2012 for Windows Phone
-
Add path to
msbuildtorhobuild.ymlin rhodes folder. For example:env: paths: msbuild: C:/Windows/Microsoft.NET/Framework/v4.0.30319/MSBuild.exe
Application changes
-
Add to application build.yml productid GUID. For example:
  wp:
    productid: 632621d0-5ecb-012e-2c97-482a1411c191
| When you use rhodes command to generate application, productid is generated automatically |
Build and run using Rhodes gem
Install Rhodes gem
-
Run application simulator:
$rake run:wp8
| You may use your computer keyboard with Windows Phone 8 emulator. By default it is disabled, but you can enable it pressing **PgUp** key. While it is enabled a device rotation simulation is not supported. To rotate device you need to disable keyboard support pressing **PgDown** key. Look [MSDN page](http://msdn.microsoft.com/en-us/library/ff754352(v=vs.92).aspx) for much more details on this topic. |
-
Run application device:
$rake run:wp8:device
See log in application folder : rholog.txt
| When running on device you may need to disconnect USB cable from device to see log |
- After Application code modifications, run rake commands. DO NOT close simulator!
Build from sources
- Checkout rhodes source code from github
Build from IDE
Rhodes
- Open
rhodes\platform\wp8\rhodes.slnin VS 2012 or VS Express 2012 for Windows Phone. - Select Debug or Release configuration, Windows Phone 8 Emulator target and build solution.
- Run emulator by pressing Start Debugging or Start Without Debugging
- After Application code modifications , build Rhodes solution and Start Debugging. DO NOT close emulator!
- See log in VS output console (Debug mode only)
How to set application name and icon
Application Name
In the build.yml in your application folder there is an entry “name”. This is the display name that the user will see on the device. Example:
name: My Own App
Application Icon
Place your image to use as an icon into the folder called icon in your application. If you created an app called testapp then the folder would be testapp/icon.
- Windows Mobile and Windows: You can add an icon in two formats:
icon.pngandicon.ico. -
iOS 4.0: Apple require three icons for application: 57x57, 72x72 and 114x114 pixels. Prepare such files, name them as
icon57.png,icon72.pngandicon114.pngand place intoiconfoldertestapp/ build.yml Rakefile rhoconfig.txt app/ public/ icon/ icon.png icon.ico
iPhone using xCode
- Target->info->General->Name
- Target->info->Build->Product Name (for all configurations)
- rhodes\platform\iphone\icon.png, icon57.png, icon72.png, icon114.png - change to your icons
- check rhodes\platform\iphone\Info.plist it should contain BundleName=${PRODUCT_NAME}
Android
You can change the icon for your Android application by replacing icon.png, which is in your application icon folder, with a new icon.png.
Windows Mobile
Windows Mobile Shell program caches program icons. This cache is cleared only when the device or the simulator is restarted. If you change the icon of your application, you have to restart the device or simulator: uninstall/install is not enough.
Symbian
You can change the icon for your Symbian application by replacing icon.svg, which is in your application icon folder, with a new icon.svg.
Upgrade Application
Rhodes 3.3 supports application code upgrade for iPhone (non AppStore distribution), Android, and Windows Mobile. You can do a total upgrade or partial upgrade.
Total Upgrade
You can replace the total application bundle with a new bundle packed in an update bundle archive file.
Prepare Total Application Package
To prepare the upgrade package for iPhone, run this command in your application folder:
$ rake build:iphone:upgrade_package
The application package will be placed in <app_root>/bin/target/iphone.
To prepare the upgrade package for Android, run this command in your application folder:
$ rake build:android:upgrade_package
The application package will be placed in <app_root>/bin/target/android.
To prepare the upgrade package for Windows Mobile, run this command in your application folder:
$ rake build:wm:upgrade_package
The application package will be placed in <app_root>/bin/target/wmp6.
Download Bundle Package and Replace Application Current Bundle
Download package:
:::ruby
if !::Rho::RhoSupport.rhobundle_download(url_to_package, url_for(:action => :httpdownload_callback))
render :action =>:error
else
render :action => :wait_download, :back => ‘/app’
end
Unzip and replace package:
:::ruby
if System.unzip_file(::Rho::RhoSupport.rhobundle_getfilename())==0
System.replace_current_bundle( File.dirname(::Rho::RhoSupport.rhobundle_getfilename()) )
render :action => :wait_replace, :back => ‘/app’
else
WebView.navigate url_for :action => :error
end
The application will restart automatically.
| On iPhone and Android, the application has to be started manually. |
| When using Rho::RhoSupport.rhobundle_download method on a network that has proxies, you may need to configure a proxy exception on the device, if your HTTP server is also on that same network. Example: local network has an IP subnet of 192.168 and it uses a proxy. On the Windows Mobile device, go into System >> Settings >> Connections >> Advanced and add 192.168.* to the proxy exception list. |
| The URL parameter for rhobundle_download must be a HTTP URL - FTP is not supported. |
Partial Upgrade
You can add new files or replace old files with new ones and create an updated bundle packed in an update bundle archive file.
Prepare Partial Application Package
To add new files or replace old files with new ones in your current application’s bundle content, make a list of the files in a file named upgrade_package_add_files.txt. Here is an example of upgrade_package_add_files.txt.
app/index.erb
app/Bundle/controller.rb
app/Bundle/error.erb
In the same way, you can also remove files with an upgrade_package_remove_files.txt file. Here is an example of upgrade_package_remove_files.txt.
app/Bundle/wait.erb
app/Model2
Execute the rake commands in your application folder to perform the partial upgrade.
To prepare partial upgrade package for iPhone run in application folder:
$ rake build:iphone:upgrade_package_partial
Application package will be placed to /bin/target/iphone
To prepare partial upgrade package for Android run in application folder:
$ rake build:android:upgrade_package_partial
Application package will be placed to /bin/target/android
To prepare partial upgrade package for Windows Mobile run in application folder:
$ rake build:wm:upgrade_package_partial
Application package will be placed to /bin/target/wmp6.
Download Bundle Package and Replace Application Current Bundle
You then unzip, upload and replace the application package.
Download package:
:::ruby
if !::Rho::RhoSupport.rhobundle_download(url_to_package, url_for(:action => :httpdownload_callback))
render :action =>:error
else
render :action => :wait_download, :back => ‘/app’
end
Upload and Replace Package:
:::ruby
if System.unzip_file(::Rho::RhoSupport.rhobundle_getfilename())==0
System.replace_current_bundle( File.dirname(::Rho::RhoSupport.rhobundle_getfilename()), { :callback => url_for(:action => :update_finished_callback), :do_not_restart_app => true } )
render :action => :wait_replace, :back => ‘/app’
else
WebView.navigate url_for :action => :error
end
With the System.replace_current_bundle method, you can supply a params hash with the following options.
:callback - url with callback. Called when upgrade bundle procedure is finished.
:do_not_restart_app - bool, if true your application will not automatically restart after the procedure is finished.
One of the callback parameters should be status: "ok" or "error".
| Use :do_not_restart_app very carefully. You can disable the restart of your application after a bundle update only if you change only images, JavaScript, and other similar types of files, but if you change files such as Ruby code, models, etc. In general, we recommend you do not use this parameter if you do not understand how your application works on your particular platform. Restarting your application after an update is safe. |
Sample Upgrade Bundle Package
See Reload bundle demo for more information.