RhoHub Gallery and RhoGallery Tutorial
This tutorial will guide you through setting up a gallery on RhoHub and adding consumers, groups, and applications to it.
It also shows how to install RhoGallery, which is the mobile app that consumers use to connect to a RhoHub gallery. It shows how to connect to a RhoHub gallery with the RhoGallery app, and how to install, run, and uninstall apps from a RhoHub gallery.
- Webinar Video
- Pre-requisite Reading
- Setup
- Understanding RhoHub Galleries and RhoGallery
- Adding a RhoHub Gallery
- Adding Applications to (and Managing) Your RhoHub Gallery
- Adding Consumers to Your RhoHub Gallery
- Adding Groups to Your RhoHub Gallery
- Managing Collaborators
- Customizing The RhoGallery Look and Feel from RhoHub
- Using RhoGallery to Get RhoHub Gallery Apps onto Your Mobile Device
Webinar Video
Pre-requisite Reading
Setup
This tutorial assumes that you have an account on RhoHub, and that you have an application(s) in it. If you have not set up a RhoHub account, see Pre-requisite Reading.
Understanding RhoHub Galleries and RhoGallery
Frameworks such as Rhodes make it easy for developers to build native apps for all smartphones. However, developers need to get those apps to user’s devices so users can test them. Enterprises with many mobile apps need to get the native apps out to all the enterprise users regardless of what kind of device the users have, need to manage who gets what apps, and need to update the apps for those users.
RhoGallery is a hosted app management solution. RhoGallery administrators can create galleries of apps, and they can invite consumers and groups of consumers to partake of those apps, and they can delete apps remotely. These apps can be Rhodes apps, or third party apps.
Note that the users of RhoGallery – who install the RhoHub Gallery apps onto their mobile device using the RhoGallery mobile app – are called consumers; this term of “consumers” is targeted at enterprise workers, to distinguish them from the RhoHub Gallery administrators.
The consumers receive an invite to a RhoGallery via SMS or email. The consumers then launch the RhoGallery app on their mobile device, and it will contain all the apps on RhoGallery for their company and job. And they will be able to organize and launch their enterprise apps from RhoGallery.
Adding a RhoHub Gallery
Before you can send your applications to consumers, you need to have a RhoHub gallery for your applications and consumers.
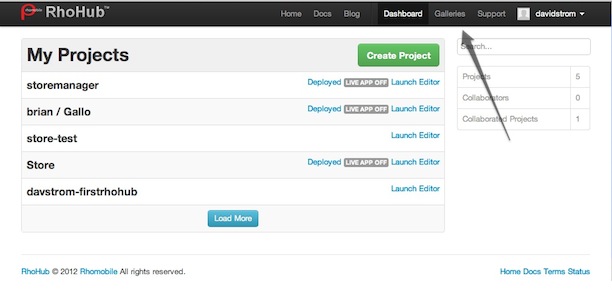
In your RhoHub account, click on Galleries.
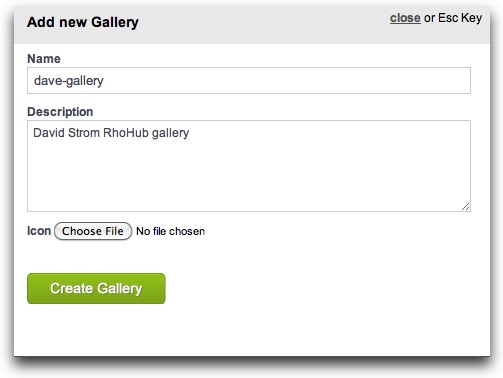
If needed, click on Galleries to show the Galleries section. In the Galleries section, click the Create Galleries button.

In the Add new Gallery pop-up window, enter a name for the gallery. Optionally, you can enter a description for your gallery, and choose an icon for that gallery. Click Create Gallery.
Adding Applications to (and Managing) Your RhoHub Gallery
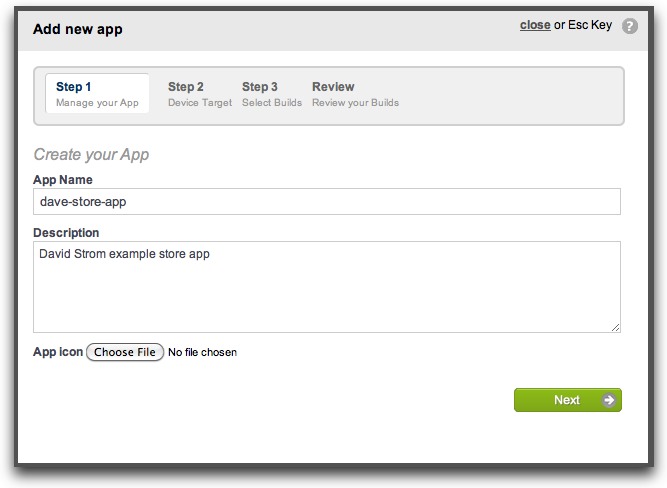
Now you need to add apps to your gallery. Click the Add a new App button.

Step 1: Manage Your App
In the Add new app pop-up window, enter the name you want for your app. You can add an optional description and an optional icon to your app (the icon defaults to a Rhodes logo). Click Next.
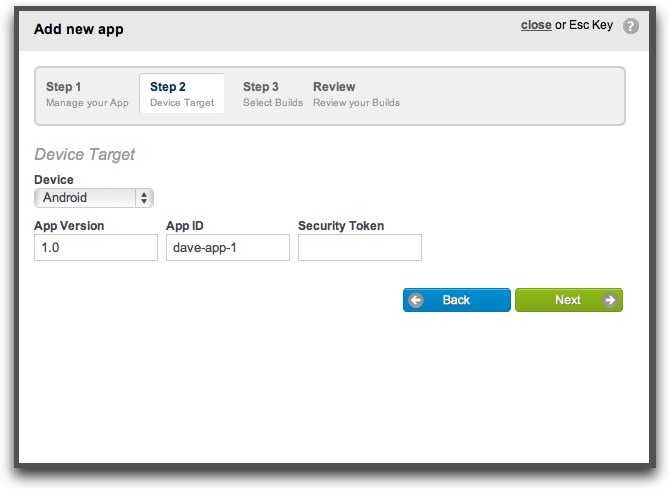
Step 2: Device Target
Select the Device type (Android, iOS, Blackberry, Windows Mobile), enter the following:
- A version number for your app. This number is displayed on the app in RhoGallery on the mobile device.
- The app ID. For example, for an Android app named fieldservice, you might use com.rhomobile.fieldservice. Enter the app ID in the format for your platform, and unique for your app.
- A security token. You enter this if you are adding a Rhodes app and you used a security_token setting in your build.yml; the app will only launch if that security token is entered.
- OS version: the OS version. Only enter this for Blackberry.
Step 3: Select the Build Type
In Step 3: Select Builds, select the type of build. (The pop-up window title changes to Upload Build Sources.)
RhoHub Build
For RhoHub Build, select a RhoHub build for a Rhodes application in your RhoHub account. Click Next.

Local Build
For Local Build, click the Select Files button, then navigate to and select the files for your application on your local computer to be uploaded to your RhoHub gallery.
- Windows Mobile: .cab file.
- BlackBerry: .jad file and all .cod files.
- Android: Signed .apk file.
- iPhone: .plist file and .ipa file.
This application does not have to be Rhodes-built: it can be any app that you have created on your computer. However, the app type must match the Device type that you selected in Step 2: Device Target.
For an iPhone app on a local build, you need to create a .plist file that you will upload to your RhoHub gallery. Use this sample iPhone plist as a template.
This .plist file has its base URL set to example.com. That is required for RhoHub local builds.
Edit this .plist file to point to your iOS application (.ipa) file: edit this line, replacing MyApp.ipa with the name of your .ipa file.
<string>http://example.com/MyApp.ipa</string>
Edit the .plist so its image URLs point to your image files: edit lines like this, replacing the image names with the names of your image files.
<string>http://example.com/icon512.png</string>
Edit the .plist file so that its bundle-identifier matches the app ID that you entered in step 2, and its bundle-version matches the version number that you entered in step 2. Look for this section in the .plist file and replace com.acme.rhodesapp and 1.0 with your app ID and version number.
<key>bundle-identifier</key>
<string>com.acme.rhodesapp</string>
<key>bundle-version</key>
<string>1.0</string>
After you have selected the .plist file and the .ipa file, click Next.
Remote Build
For Remote Build, enter the link to the application file.
- Windows Mobile, .cab file.
- BlackBerry, .jad file.
- Android, .apk file.
- iPhone: .plist file.
This example shows a link to an Android build on toshl.com, a third party expense tracking application.

Click Next.
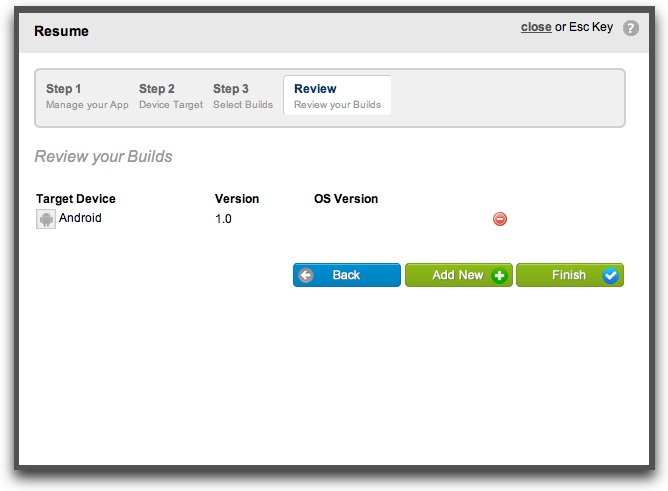
Step 4: Review
In Review, click Finish.
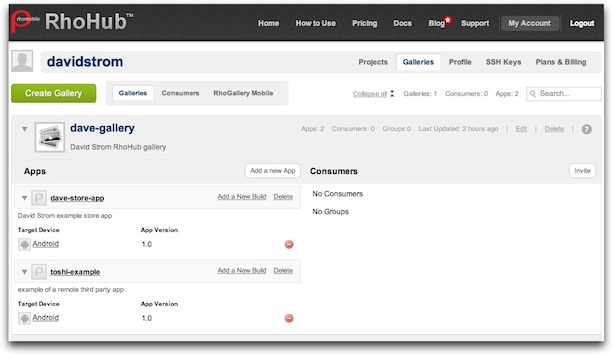
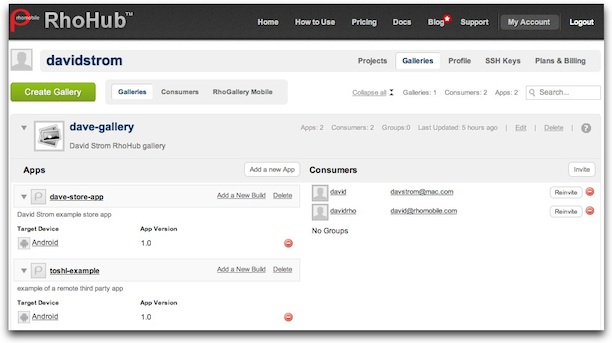
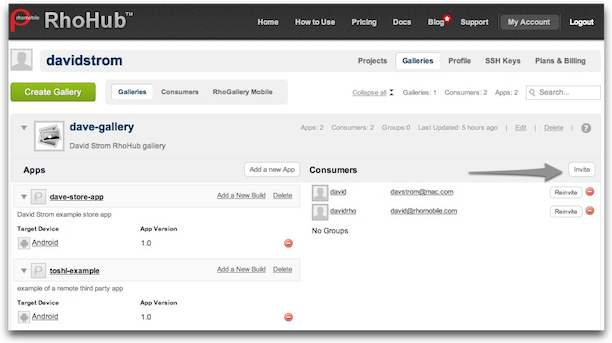
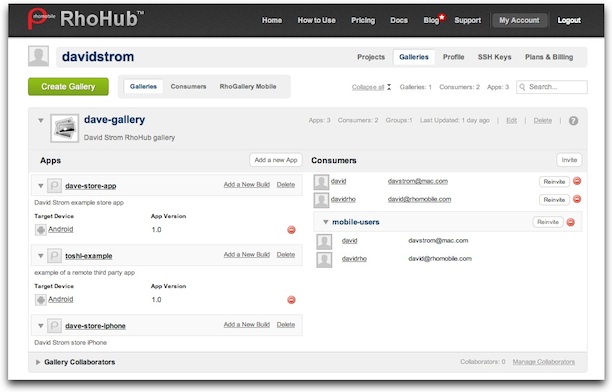
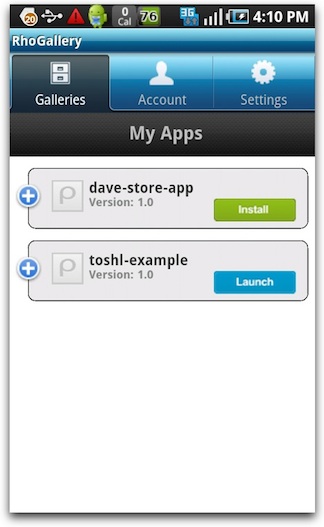
You now have an app in your RhoHub gallery. Here is an example of a gallery with a RhoHub app and a remote app.
Adding Consumers to Your RhoHub Gallery
You also need consumers for your app. Consumers can use the RhoGallery mobile app to receive your app from your RhoHub gallery, and install it on their mobile device.
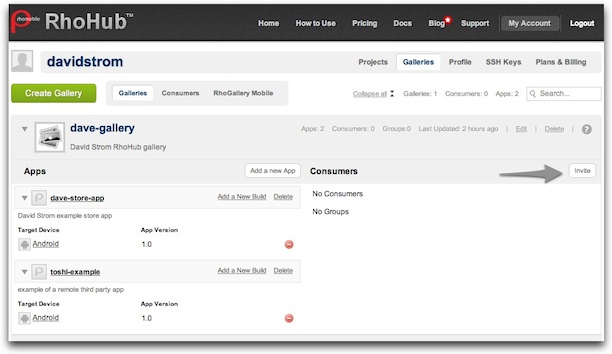
From your gallery, click the Invite button.
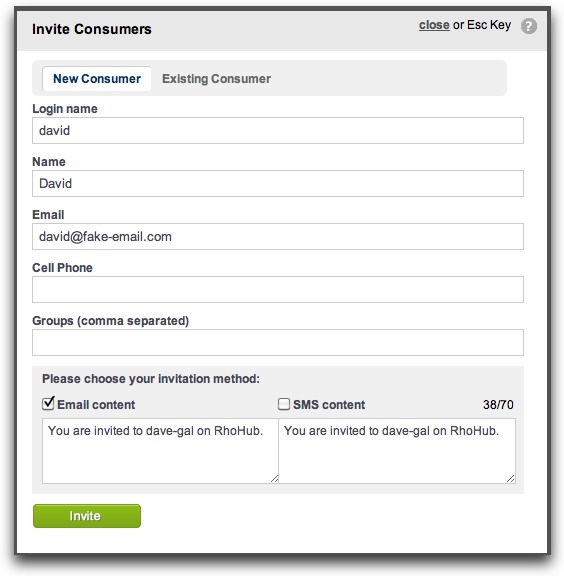
In the Invite Consumers pop-up window, enter a login name for your consumer, your consumer’s name, and check the checkboxes to notify the consumer via email, or SMS, or both. Enter your consumer’s email address if you notify by email; enter your consumer’s cell phone number if you notify by SMS. You can also enter groups you want your consumer to be in; if the group does not exist yet, this will create the group.
You will see the consumer added to your gallery.
The consumer will receive an email, or an SMS, or both, similar to the following:
You are invited to dave-gal on RhoHub.
Install RhoGallery: http://bit.ly/getrho
RhoHub Account: davidstrom
Username: david
Password: temporary-password

Thanks, RhoHub Support
Consumers will enter the RhoHub account name, the Username, and the Password into the RhoGallery app on their mobile device to join your RhoHub gallery. This is discussed later in this tutorial.
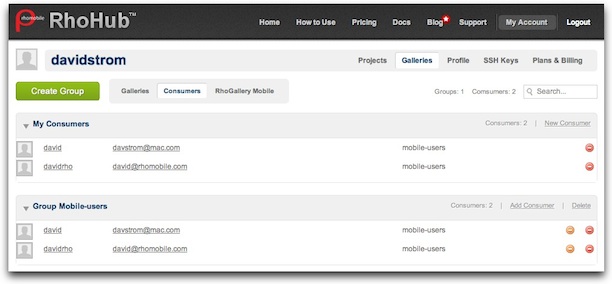
Adding Groups to Your RhoHub Gallery
You can create groups and add consumers to those groups. For example, you may wish to have a group for sales consumers, and another group for engineers. Also, you can add these groups to other galleries. For example, if you create a new gallery, you can add the sales group from your original gallery to your new gallery.
To create a group, go to the Consumers section in your gallery by clicking on Consumers.
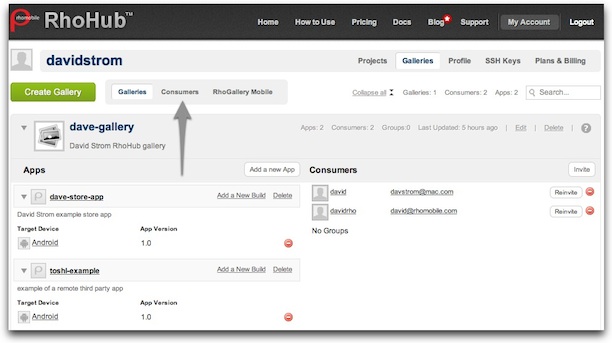
In the Consumers section, click the Create Group button.

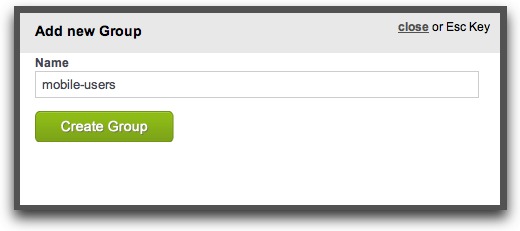
In the Add new Group pop-up window, enter the name for your group, then click Create Group.
Now you can add consumers to the group. Click on Add Consumer.
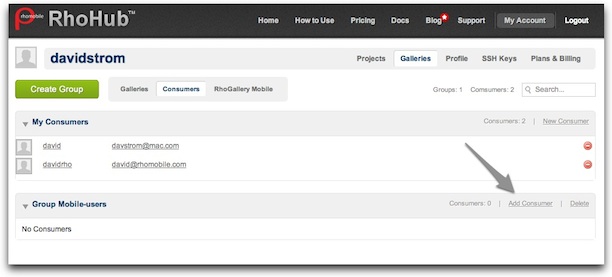
In the Add Consumers pop-up window, under the New Consumers tab, you can add a new consumer to your group by entering a login name and consumer name, and entering your consumer’s email address to notify by email, or cell phone number if you notify by SMS. (This is the same process you would use when you add a consumer from the Gallery section.) Then click Invite.
Under the Existing Consumer tab, you see a list of consumers whom you have added to your gallery. To add these consumers to your group, check the checkbox for those consumers. Then click Invite.
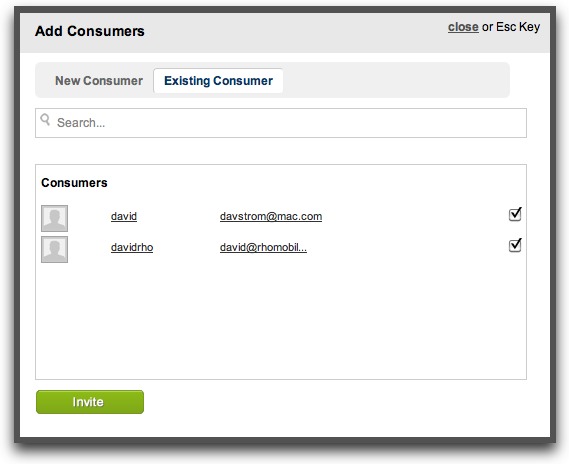
Those consumers are added to the group.
Now add the group to your gallery. In the Galleries section, click on the Invite button, as you did when you invited consumers to the gallery.
In the Invite Consumers pop-up window, click the Existing Consumers tab. Then check the checkbox for the group that you are adding to your gallery. Then click the Invite button, then Close.
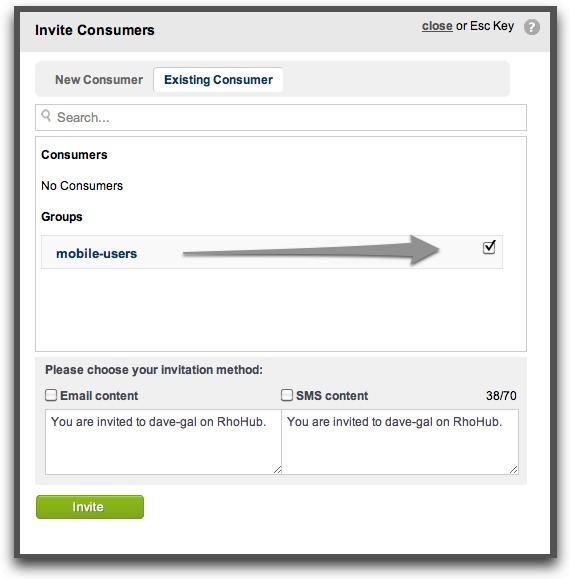
The group is now added to your gallery.
Managing Collaborators
You can add collaborators. Collaborators are other people who have RhoHub accounts who can work with you on this gallery. To add a collaborator, in the Galleries section, click on Manage Collaborators.
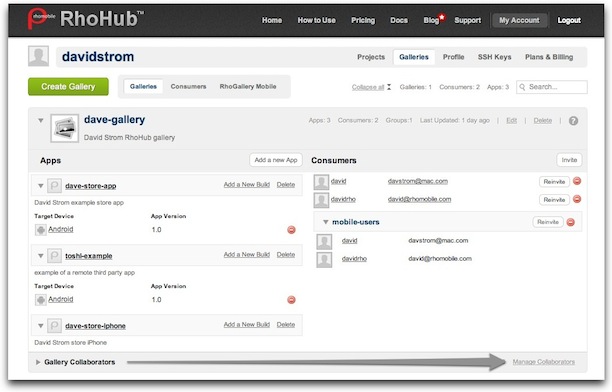
In the Manage Collaborators pop-up window, enter the RhoHub user name, then click the Add Collaborator button.
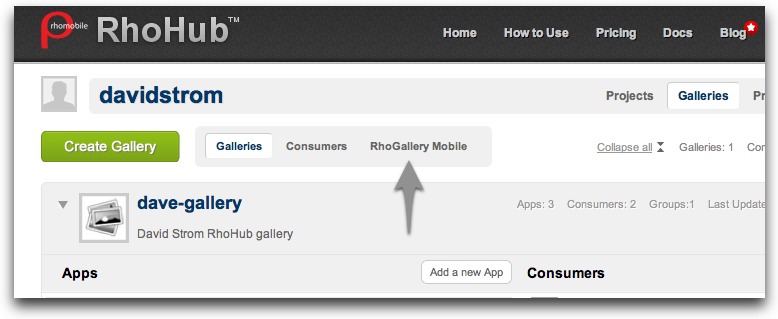
Customizing The RhoGallery Look and Feel from RhoHub
You can build your own custom RhoGallery Mobile. From the “Galleries” tab, select the “RhoGallery Mobile” section.
In the RhoGallery Mobile section, you can customize the look and feel of RhoGallery on the supported platforms that your RhoHub gallery consumers will see when they receive invitations to join your RhoHub gallery.
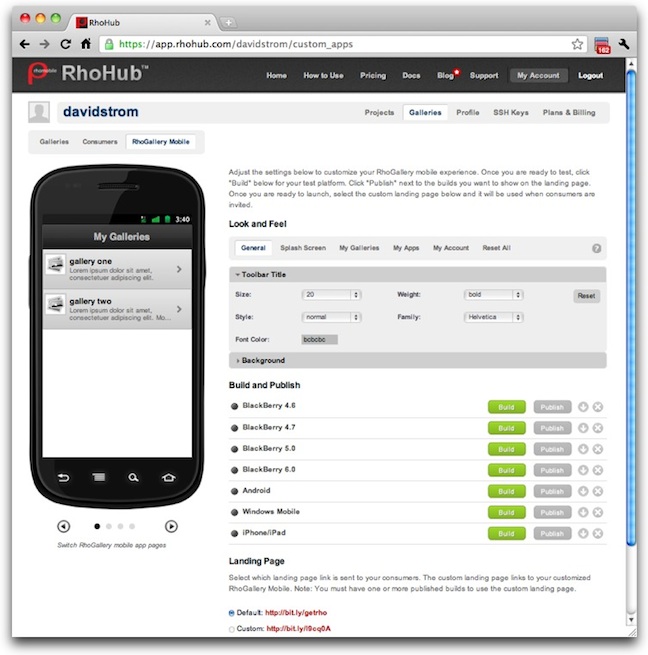
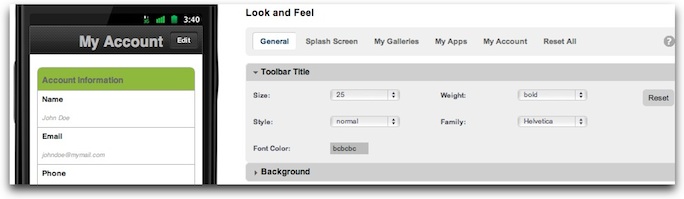
Look and Feel: General Tab
Under the General tab for Look and Feel, you can adjust the size, weight, style, family, and font color of the Toolbar Title text. You can also change the background color for the Toolbar Title.
Click the Reset button to undo your changes.
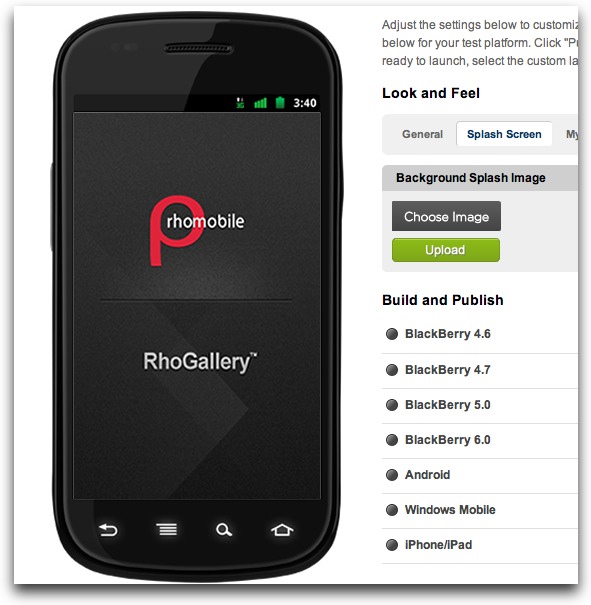
Look and Feel: Splash Screen
Under the Splash Screen tab for Look and Feel, you can add a custom image for the background, if you want to change the standard RhoGallery image.
Click the Reset button to undo your changes.
Look and Feel: My Galleries
Under the My Galleries tab for Look and Feel, as with the General tab, you can adjust the size, weight, style, family, and font color of the Name and Description text for your RhoHub galleries displayed in the gallery list for the RhoGallery mobile app. And as with the Splash Screen, you can also upload a custom image for your gallery.
Click the Reset button to undo your changes.
Look and Feel: My Apps
Under the My Apps tab for Look and Feel, as with the General tab, you can adjust the size, weight, style, family, and font color of the Name, Version, and Description text for your RhoHub apps displayed in the app list for the RhoGallery mobile app. And as with the Splash Screen, you can also upload a custom image for your app.
Click the Reset button to undo your changes.
Look and Feel: My Account
Under the My Account tab for Look and Feel, as with the General tab, you can adjust the size, weight, style, family, and font color of the Informational Header, Title, and Summary Data text, and the background color for your Informational Header and Background color, for your RhoHub account displayed in the RhoGallery mobile app.
Click the Reset button to undo your changes.
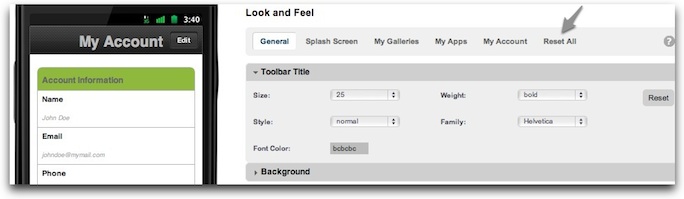
Look and Feel: Reset all
If you want to go back to the defaults for the look and feel, losing any changes you made, click Reset all.
Build and Publish
For your RhoGallery users to access your custom landing pages, you must build and publish them. You publish your custom landing pages under Build and Publish. Click the Build button to build your custom landing page for your desired device type. Then click Publish to publish the landing page. You must have published one or more app builds for the respective device type in order to publish the custom landing page.
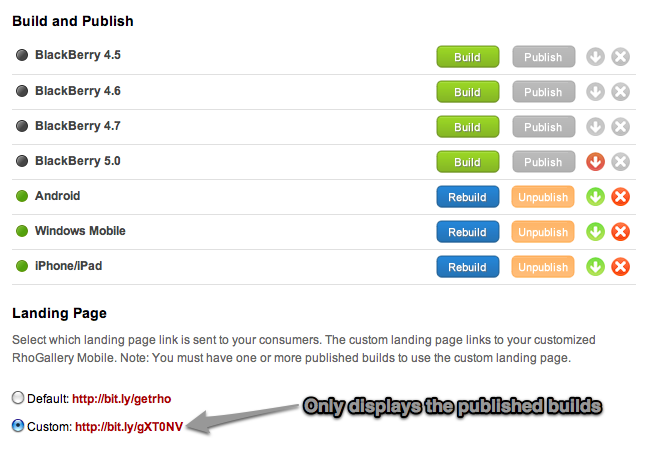
Landing Page
Under Landing Page, select which landing page is sent to your consumers. You can still use the standard RhoHub page, or you can link to your customized RhoGallery Mobile landing page, which contain the customizations that you have done in RhoGallery Mobile. This link will only display the pages that you have built and published.
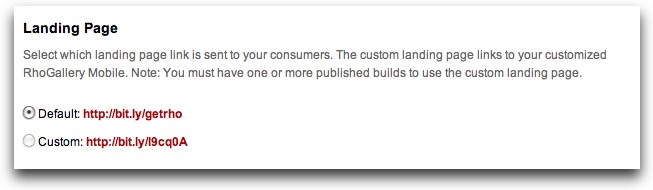
When your consumers navigate on their mobile device to the link provided for your custom landing pages, they will see a list where they can download the RhoGallery app that uses your published and built custom landing pages.
Using RhoGallery to Get RhoHub Gallery Apps onto Your Mobile Device
RhoHub gallery administrators can invite mobile device owners to connect to their RhoHub gallery. You use the RhoGallery app on your mobile device to connect to that RhoHub gallery. Then you can install the apps in that RhoHub gallery onto your mobile device, and run those apps.
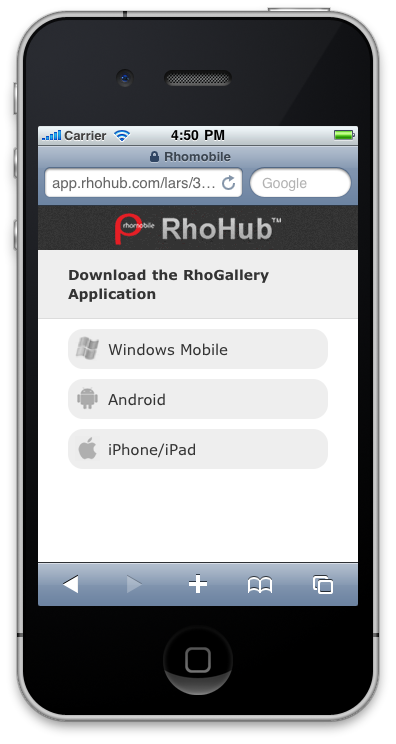
Installing RhoGallery on a Mobile Device
A mobile device must have the RhoGallery application installed in order to sync with a gallery on RhoHub. To install the RhoGallery application, open your device’s web browser, go to http://bit.ly/getrho, and install the RhoGallery app.
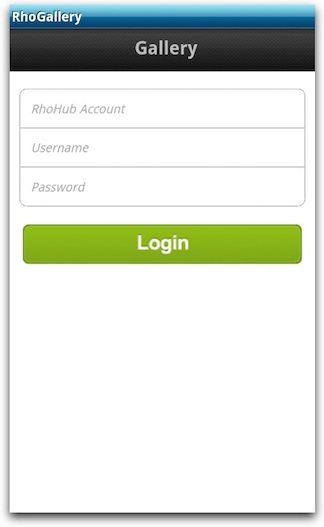
Connecting to a RhoHub Gallery from Your Mobile Device
When you open the RhoGallery app on your mobile device, you enter the name of the RhoHub gallery to which you wish to connect, and your username and password.
You received this information in the email and/or SMS that was sent when the RHoHub gallery administrator invited you to join that RhoHub gallery.
You are invited to dave-gal on RhoHub.
Install RhoGallery: http://bit.ly/getrho
RhoHub Account: davidstrom
Username: david
Password: temporary-password

Thanks, RhoHub Support
Installing Apps from a RhoHub Gallery onto Your Mobile Device
Once you have connected to a RhoHub gallery from your mobile device, you can install applications from that gallery onto your mobile device and run them. Here is an example of a mobile device logged into a RhoHub gallery, and a list of applications in that gallery. (This is under the Galleries tab in RHoGallery.)
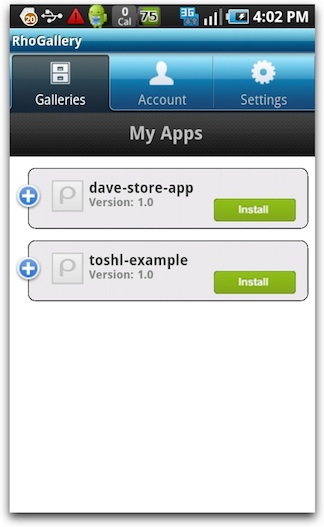
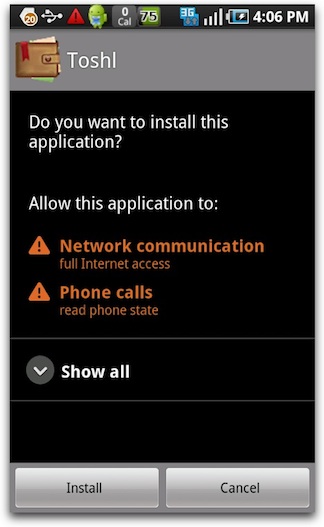
To install any of those applications on your mobile device, click the Install button for that application. For example, if the RhoHub account has the external app Toshl, you can click its Install button in the RhoGallery apps list.
You will be asked if you want to install the application. Click the Install button.
After the application installs, click the Done button (or Open if you want to run it immediately).
Launching Apps from a RhoHub Gallery on Your Mobile device
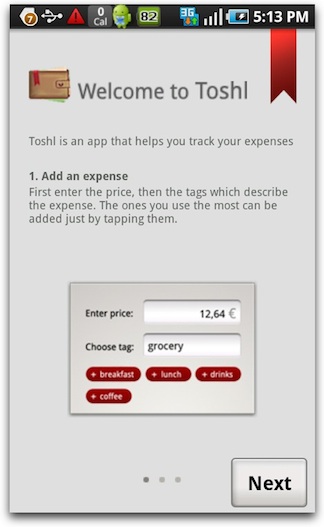
Once you have installed an app from a RhoHub gallery, you can run it. Click the Launch button to run the app.
And the app runs.
Uninstalling RhoHub Gallery Apps From Your Mobile Device
To uninstall an app that you installed with RhoGallery, click the plus icon to the left of the app name in the app list in RhoGallery. Then click the Uninstall button.
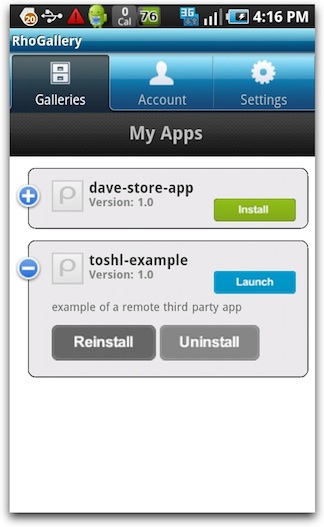
Note that this RhoGallery uninstall does not work for iOS apps; you cannot uninstall iPhone or iPad apps from RhoGallery. However, you can still use the standard iPhone/iPad uninstall procedure to uninstall the app.
Editing your RhoGallery Account
Click the Account tab to see your account information.
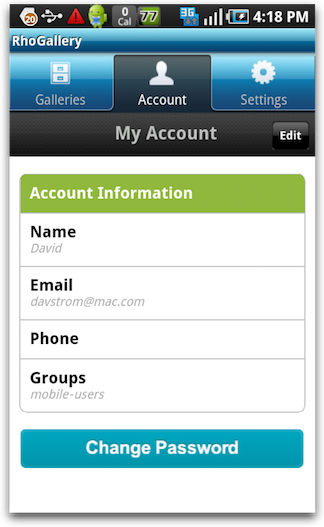
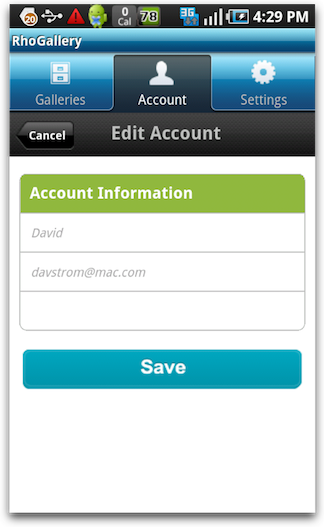
If you want to switch to another RhoGallery account, click the Edit button. Then enter the RhoHub Account name, Username, and Password for that account, as you did when you connected to the RhoHub gallery. Then click the Save button.
Changing Your RhoGallery Settings
Click the Settings tab to see your RhoGallery settings.
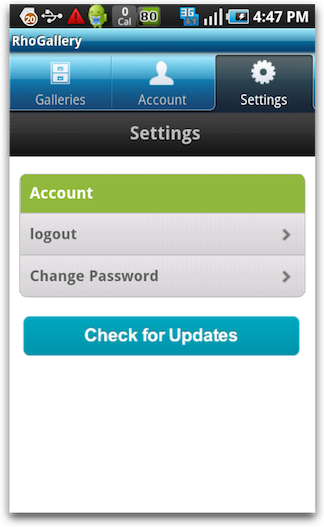
Click on logout to log out of your RhoHub gallery connection.
Click Change Password to change the password for your connection to this RhoHub gallery.
Click Check for Updates to check for updates to the RhoHub gallery.