Remote Build Guide
This guide will assist you in building your apps using the remote build capabilities of rhomobile.com. Using this tool you will be able to build for any of the platforms that we support regardless of your computer hardware. That means you will be able to build iOS apps even if you are using a Windows computer and build Windows Mobile apps even if you are using an Apple computer. There are however, a few limitations to this build process and we have listed them below.
- Support Matrix
- Setup
- Generating an App
- Using a Public GitHub Repository
- Using a Private GitHub Repository
- Building Your App
- Remote Build Limitations
- Troubleshooting
Support Matrix
The following is a table showing the versions of Rhodes that are supported for which platforms concerning cloud builds. Note that the end of life date is simply an estimate and will not necessarily be exact to the day. Note that dates for estimated End of Life are subject to change as release dates of next versions change.
| Rhodes Version | Estimated End of Life | Platforms | |||
|---|---|---|---|---|---|
 |
 |
 |
 |
||
| 3.5.1.14 | TBD | ||||
| 4.0.9 | TBD | ||||
| 4.1.6 | TBD | ||||
| 5.0.2 | TBD | ||||
| 5.0.25 | TBD | ||||
| 5.0.30 | TBD | ||||
Note: Micro Kiosk devices (MKxxxx) are not supported for cloud-built apps. For these devices, Enterprise Browser is also available as an app building solution alternative.
Setup
Before building remotely, you’ll need to sign up for a subscription plan of either silver or gold; only paid subscription plans allow the use of the remote build feature. Refer to the licensing doc for assistance on signing up and applying your remote build token.
Note: Once you login using your rhomobile.com account credentials, the token used to verify your identity will be saved for about a week, at which time you’ll need to have an data connection in order to update your token. You must do this even if you are building your app off-line.
Generating an App
Using RhoMobile’s product suite, apps can be built using either the command line interface, or with our eclipse based IDE, RhoStudio. All steps will be shown using both methods.
App structure
RhoMobile makes the entire app creation process extremely quick by auto-generating common files for you so that you can get into coding your specific app as soon as possible. During either of these processes you’ll see the framework create all the necessary files.
Generate Using CLI
To generate the app’s structure using the command line, simply run the following command:
$ rhodes app <appanme>
Generate in RhoStudio
To generate the app’s structure using RhoStudio, follow these steps:
- Select new app creation File > New > Project.
- Select RhoMobile Application and click Next.
- Type in a name for your app, choose whether or not to make a RhoElements app, and click Finish.
At this point, you can actually build the app for the platform of your choice and you’ll have a fully functioning, bare-bones app. It currently does nothing but you have created the structure of a running app in just about a minute, with no coding necessary on your part. but how do we get this app to build in the cloud?
Using a Public GitHub Repository
Once you've set up your account and generated an app it's time to build that app for a device. To build locally using RhoStudio or the command line interface follow our guide on running your app locally. To build your app remotely, start by logging into your rhomobile.com account and add an app to your account that has the same name as the app that you just created in RhoStudio or with the CLI. The name of the remote project does not need to be the same but it aids in reducing confusion. If you experience trouble during any of the steps below, please see our troubleshooting section below.

Note: This is step simply make an empty repo for you to push code up to, there is no code generation happening at this point. To generate code, you must use either RhoStudio or the CLI.
Online Interface

Once you have created the remote end of the app you will see a screen like this. On this screen you can either build your app remotely from inside your browser or you can copy the git URL to build from RhoStudio or the command line. For the purposes of this guide, let's copy the git URL by clicking the copy icon next to the Git URL field. Once you have done that, you'll need to associate your local project with your remote project.
Local Git Association
Open you command line utility (terminal on Mac and cmd on Windows), navigate to your projects root folder and run the following commands:
$ git init
$ git remote add origin <Your Git URL>
$ touch README.md
$ git add .
$ git commit -m 'Initial commit'
$ git push -u origin master
Let’s walk through these commands to understand what’s going on.
-
git init- This initializes your local project’s directory as a git repository. -
git remote add origin <Your Git URL>- This will associate the remote git repo that you specify using your Git URL to the local repo. -
touch README.md- This creates a README markdown file. You can use this file to describe to others what your app is all about. This step is optional. -
git add .- This stages all the files in your project to be committed and pushed to the remote repo. Note, theadd .command should not be used frequently, it is used here as an initial startup process. Usually you’ll want to add files individually as to not commit files mistakenly. -
git commit -m 'Initial commit'- This will finalize the addition of the files you have just added and will make note that this is the initial commit of this repo. -
git push -u origin master- This will upload the files you have committed to the remote repo. The-uoption is used to set the upstream endpoint so that in the future, all you need to use isgit pushto upload to origin/master. In this case, “origin” is the name of our remote endpoint and “master” is the name of the branch we are pushing code up to. If you wanted to push to a different branch you would usegit push -u origin <your_branch>.
That’s all there is to it! You can now build your app remotely on rhomobile.com.
Using a Private GitHub Repository
You may wish to perform a remote build using an app inside of a private GitHub repository. To do so, there is a bit of setup that must be done first.
Note: If you’ve already accepted the ‘rhohubbuild’ user into your organization, you do not need to re-invite the user( aka: the private repository setup applies across rhomobile applications in your GitHub organization). If you are unsure, see the optional step at the bottom of this section to check if the user is already invited.
Step One: Invite
Inside of Github, invite the user ‘rhohubbuild’ to a team in your organization. Steps for adding members to your organization can be found in GitHub’s documentationn. This user will need access to your repository before it can clone your private repository for the purposes of building.
Step Two: Accept Invitation

In your Rhomobile.com account profile, click the GitHub tab on the left to access the GitHub integration info. You'll need to add your organization's GitHub name in the first text box. This name needs to be EXACTLY the same as what's on GitHub or the connection will not work. Then push the 'Accept Invite' button. This will use GitHub's API V3 to accept the 'rhohubbuild' user invitation.
Step Three: Build
First click the "Change Git Source" button and then enter your SSH GitHub clone address in the main build page and hit save. This is the address that starts with `git@github.com`. Now you're ready to build using your private GitHub repository.

Optional Step: Confirm Acceptance of Invite

If you would like to confirm that your organization has fully accepted the 'rhohubbuild' user, and that you are set to clone from a private repository, please enter your organization name below and click the 'Check Invite' button.
Building Your App
To build your app remotely, you have tree different ways that you can go about it:
1. Build your app directly on rhomobile.com.
2. Build your app remotely through RhoStudio.
3. Build your app remotely through the Command Line Interface.


Online Build
RhoStudio Build
Command Line Build
Rhomobile.com Build

Building on rhomobile.com is fairly straight forward, once you have completed the steps above, you'll see a screen similar to this one once you sign into rhomobile.com. From here, all you need to do is select the parameters you want to build with from the drop-down boxes shown and click build.
| When building for iOS you will need to provide your developer certificate, the password for that certificate, your provisioning profile file, and your bundle identifier. These items are not necessary when building for other platforms but Apple is very strict on it's policy for building apps. |
Once you have built your app through the online console, you will be able to click the download icon to download the app package (.apk for android, .cab for Windows Mobile, etc), put the package on your device, and install it. If the build failed, you'll be able to download the logs of the build to debug the reason for the failed build.


In addition to the clickable link download your app's package, you can also hover over the QR icon and it will expand, showing a QR you can use to download the app directly to your device. Alternatively, if you click the QR icon it will download the app to your machine.
RhoStudio Remote Build
Note: Before remotely building through RhoStudio, you’ll need to manually push any recent changes that you want your app to build with up to your remote repo using the command line. Simply add, commit, and push the changes, similar to the last three steps in the Git Integration section above.
When you start RhoStudio for the first time, you'll be prompted to provide your rhomobile.com email and password (You must have an active and open internet connection for this to work properly). This will connect your RhoStudio installation with your account on rhomobile.com and allow for cloud building, should your subscription level permit cloud builds.

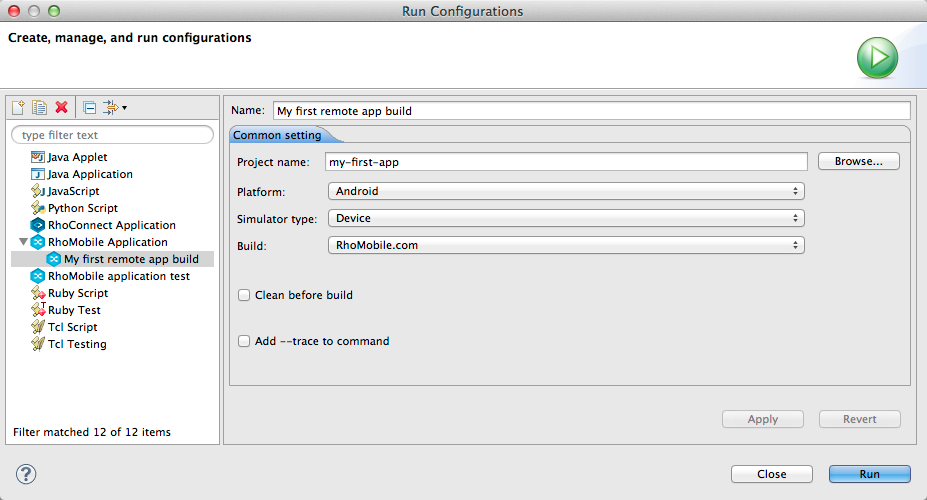
Once you have logged in and RhoStudio has verified your subscription, you build your app the same way you normally would but in the build configuration for your app, choose "Rhomobile.com" in the Build field. This type of build can only be done for device and simulator builds. Click run and the app will start to build remotely. If you receive error concerning your local build during this step, it does not necessarily mean the the remote build failed.
Once the app has finished building, the app will be downloaded and placed into the <appname>/bin/<platform>/ folder. Upon build failure, the build log will also be stored in the aforementioned folder, as well as all app build behavior being printed out in the RhoStudio console.

Command Line Interface Build
Note: Before remotely building through the command line interface, you’ll need to manually push any recent changes that you want your app to build with up to your remote repo. Simply add, commit, and push the changes, similar to the last three steps in the Git Integration section above.
The first time you attempt to build, you'll be prompted to enter the email and password you used to sign up with on rhomobile.com. Entering this information will connect your installation to your account on rhomobile.com and allow you to build according to the restrictions of your account subscription.


To build your app remotely from the command line, after you've logged in, you will need to use one of many rake commands. To view the available rake commands, run the command $ rake -T. Once you have decided on the command to use, run that command and wait for the build process to finish. For this example, we will keep with the Android theme and build for an android device using the command $ rake cloud:android:device which will build our app into an .apk that we can download and install onto our device.
Once the build process finishes, it will automatically download and uncompress the app package into the <app-project-directory>/bin/<platform>/ directory, similar to the way that RhoStudio does this.

Note: When building an Android app to run on the simulator, i.e.
rake cloud:run:simulator[build_id], you must have the corresponding Android SDK installed or it will not run. The rake task will run, download, and unpack the app, and then fail to launch with the message ‘Wrong Android emulator version: . Android SDK target API is not installed’.
Remote Build Limitations
There are a few limitations that our remote build service must adhere to in order to function properly and efficiently:
- The number of concurrent builds on the remote build service is limited to two. If you attempt to build a third, the app will not build and you must re-attempt the build once there are less than two builds running.
- RhoMobile supports writing your own, custom native extensions however, these custom extensions are not supported by the remote build service. If you must include a custom native extension, you must build the app locally.
Troubleshooting
Here are a few issues that may come up while you are attempting to build remotely:
Q: I’m getting the error ‘Missing or invalid 'android’ section in rhobuild.yml' when I attempt to build my app.
A: This is an issue that comes up when you have not configured your settings correctly in your rhobuild.yml file. To fix this in RhoStudio, open the RhoMobile > Android section in the preferences and fill in the correct information for the Android SDK and NDK. The same thing goes for incorrect information for Windows Mobile builds, only that you will need to fill out the Windows Mobile section instead of the android section. See our RhoBuild.yml section of the build config doc for more information.
Q: I’m getting the error ‘Current project folder … is not versioned by git’ when trying to build remotely.
A: This error is caused by not having setup your app’s remote endpoint yet. Follow the instructions here to get setup.
Q: I’m getting the error Current project folder … has git origin It is not supported by cloud build system.
A: This happens when you are trying to build remotely to a GitHub repo instead of a remote repo on rhomobile.com. You must change the remote repo that is associated with your local project folder to one that exists on rhomobile.com.
Q: I’m getting the error “error: src refspec does not match any. error: failed to push some refs to ‘’”
A: You’ll get this error if you forget to add and commit your changes before your initial push. Follow the instructions here closely to remedy this.
Q: I’m getting an access denied error when I try to push my code up to the remote repo.
A: The most common cause for this is that you have not yet added your SSH public key to your account on rhomobile.com. Follow github’s guide on SSH keys to generate your public key if you have not already done so. Then go to your profile on rhomobile.com (after signing in, click “Profile” in the account menu in the upper-right corner of the page) and select “SSH Keys” to add it to your account.
Q: My app will not connect to my RhoConnect server. Why Not?
A: There is a known issue wherein the app will not appropriately start the ‘ANS’ service required for some parts of the app to work properly. There is a workaround for this: include rhoconnect-push in the app’s build.yml file. This will apply the required manifest settings, allowing the app to start the ANS service.