Build for Windows
- Introduction
- Set up development host
- Build from the command line
- Minimize the target footprint (optional)
- Create an app installer (optional)
- Logging
- Switching Qt versions
Introduction
This guide documents the use of Microsoft Visual Studio 2015 or 2012 or 2008 to build RhoMobile apps for Windows desktop editions, including Windows XP and XP Embedded (XPE). Visual Studio is required to build apps that target ‘big’ Windows, and along with the RhoMobile Suite should be installed prior to starting this guide. If RhoMobile is already installed, it must be configured according to the native SDK setup instructions for building Windows apps.
Building apps for Windows also relies on the Qt cross-platform application framework. As of RMS 7.0, the following Qt versions are supported:
- Qt 5.9.6
- Qt 5.5.0 (not required for XP and XPE)
- Qt 5.1.1 (required for XP and XPE)
| Qt 5.1.1.0 exhibits inconsistent behavior when a finger or stylus is used for input. |
| Microsoft Visual Studio 2012 and 2008 should be used only for XP builds |
Prerequisites
- Microsoft Visual Studio 2015 or 2012 or 2008
- RhoMobile Suite 6.0 (RMS 5.2 if targeting only Windows XP or XPE)
- RhoMobile configured for native development
Set up development host
Step 1- Download and install Qt
About Windows XP target support: Qt 5.1.1.0 is the only Qt version supported for making RhoMobile apps with Visual Studio 2008 or 2012 that target Windows XP and XPE. Zebra has built binaries from Qt source to make them compatible with Windows XP and to support zlib, SSL, .png, .jpg, FreeType fonts, etc. These freely distributable binaries are linked against OpenSSL and implement the HTTPS protocol. If additional or different binaries are required for your app, please refer to Qt’s documentation for Configure Options and Building from Source.
-
Create the directory
C:\Qt\Qt5-sslon the development host. -
Download the appropriate version of Qt:
- To target Windows XP/XPE with Visual Studio 2008, download Zebra’s Qt 5.1.1.0 VS2008 binaries.
- To target Windows XP/XPE with Visual Studio 2012, download Zebra’s Qt 5.1.1.0 VS2012 binaries.
-
To target modern Windows versions with Visual Studio 2015, download Qt’s 5.9.6.0 binaries.
Note: In this scenario, a separate set of Zebra OpenSSL libraries implement the HTTPS protocol, and are included automatically when performing a production build (see Build sections, below).
- Extract (or install Qt’s binaries) into the directory created in Step 1.1.
Step 2- Add the QTDIR System Variable
1. On the Windows Desktop, right-click ‘Computer’ and select -> Properties.
2. Select ‘Advanced System Settings’ in the System Properties window.
3. In the ‘Advanced’ tab, click the ‘Environment Variables’ button to bring up a window similar to the one below:
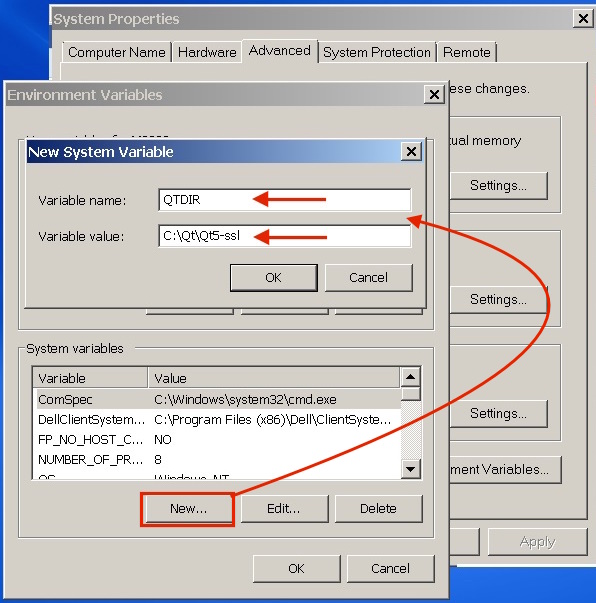
4. Click the lower ‘New…’ button to create a new System Variable. (If a variable called ‘QTDIR’ already exists, double-click to edit it).
5. Enter ‘QTDIR’ in the Variable name field.
6. Enter C:\Qt\Qt5-ssl in the Variable value field.
7. Click ‘OK’ to close the dialog and OK again to close and save the setting.
8. Restart the system for changes to take effect.
If the development host has just a single version of Visual Studio installed, skip to the Build section; the system is now ready to build.
Step 3- Select a Visual Studio version
If more than one version of Visual Studio is installed, the system by default will build the application using the newest supported version (2015 or 2012 or 2008). To explicitly specify the version of Visual Studio to use, add an msvc parameter to the win32 section of your build.yml and specify 2015, 2012 or 2008:
win32:
  msvc: 2015
The system is now ready to build with the selected Visual Studio edition.
Build from the command line
Building for Windows
To build and run the application, execute the following command:
$ rake run:win32
To clean all temporary and binary files, execute the following command:
$ rake clean:win32
To build an installer bundle:
$ rake device:win32:production
After the build process is finished you will find an installer bundle named:
<application-name>-setup.exe
in the folder:
<application-root>/bin/target/win32
Building for Windows XP Embedded
After the development host has been configured for Windows XP Embedded according to the Setup section above, use the following commands to build for XPE. To optimize the size of the XPE executable and its runtime footprint, please refer to Minimize the target footprint, below.
Clean out temporary and binary files by executing the following command:
$ rake clean:winxpe
Build an installer bundle:
$ rake device:winxpe:production
After the build process is finished you will find an installer bundle named:
<application-name>-setup.exe
in the folder:
<application-root>/bin/target/win32
Minimize the target footprint (optional)
The size of the Windows executable can be minimized by excluding Qt and/or Visual C runtime libraries, and the target configured to execute multiple apps from a single shared instance of those DLLs.
Important: Optimized apps will not run on the target unless it has been configured as described this section; excluded DLLs must be installed separately on every target. Zebra simplifies this process with a set of target runtime installers that automatically install all required Qt DLLs into a shared location and configure target path settings accordingly. Alternatively, Qt5 DLLs can be copied to a folder on the target, the path to which must be added to the PATH environment variable and the QTDIR system variable removed.
| Zebra runtime installers include Zebra's Qt library builds, and should not be used if different Qt DLLs are required. |
Step 1- Specify DLL exclusions
1. Add one or both of the boolean parameters deployqt and deploymsvc to the win32 section of your build.yml and exclude the corresponding runtimes by setting their values to 0, as below:
win32:
  deployqt: 0
  deploymsvc: 0
2. Rebuild the app; the resulting executable will exclude the specified DLLs.
Step 2- Install RhoRuntime Qt installer
RhoRuntime Qt installers optimize memory footprint by installing a single instance of the Qt runtime libraries and define a path on the target to allow sharing of the libraries by multiple applications.
1. On the target(s), download and execute the appropriate installer:
- RhoRuntime for QT 5.1.1.0 for Visual Studio 2008
- RhoRuntime for QT 5.1.1.0 for Visual Studio 2012
- RhoRuntime for QT 5.5.0.0 for Visual Studio 2012 (not compatible with Windows XP/XPE)
- RhoRuntime for QT 5.9.6.0 for Visual Studio 2015 (not compatible with Windows XP/XPE)
2. Restart the target to activate new path settings.
Step 3- Install the Microsoft runtime
Download the Microsoft Visual C++ runtime and install it. The installer configures the target to allow sharing of the runtime by multiple applications.
Create an app installer (optional)
The Nullsoft Scriptable Install System (NSIS) is an open source platform for creating installation files for Windows apps. Follow these instructions to make an installer for your app:
1. Download and install the NSIS installer tool.
2. Add path to the NSIS complier in your rhobuild.yml file, which is in the \rhodes folder:
On 32-bit platform:
env:
  paths:
    nsis: C:/Program Files/NSIS/makensis.exe
On 64-bit platform:
env:
  paths:
    nsis: C:/Program Files (x86)/NSIS/makensis.exe
Readme, license and Icon
3. To present a user license agreement, place the license in a file called LICENSE.txt in the root of application folder. This will be displayed on separate page during installation and allows the installer to accept the license.
4. To present a Readme file, place the readme text in a file called README.html in the root of application folder. It will be displayed by the installer when the installation concludes.
For more information, please refer to the NSIS User Guide.
Logging
The application log ‘Rholog.txt’ is placed in <Application folder>\rho
Switching Qt versions
RhoMobile applications can be built only with Visual Studio 2008, Visual Studio 2012 or Visual Studio 2015, and only with Qt 5.1.1, Qt 5.5.0 or Qt 5.9.6 If after following the steps above a different version of Qt is desired, follow these steps to make the switch:
- Go to the Qt website and download and install the desired Qt version for Visual Studio 2008 or Visual Studio 2012 or Visual Studio 2015.
- Verify the Qt installation path. It should be something like:
C:\Qt\Qt<QtVersion>\<QtVersion>\<VSVersion> - Close RhoStudio and all command-prompt windows.
- Update or create a system variable called ‘QTDIR’ with the directory verified in Step 2.
- Update the
msvcparameter in theBuild.ymlto reflect the desired Visual Studio version, if necessary. - Be sure the
deployqtanddeploymsvcparameters in thebuild.ymlboth contain a value of 0. - Start building the application.
- Prepare a target system for testing the newly built application (which must not be the development host):
- On the test target, install the Microsoft Visual C++ Runtime for 2008 or 2012 or 2015 to coincide with the version being used for the build.
- Install the same Qt version on the target system as installed in Step 1, above.
- Add the installed Qt directory from Step 2 to the ‘PATH’ environment variable (use a semicolon to append to the end of the path).
- When the build finishes, copy the contents of
<application-root>/bin/target/win32/tmpfrom the development host to theC:\<application-root>of the target. This is the newly built application. - Close any command-prompt windows that might be open on the target.
- Double click application on the target:
C:\<application-root>\<Application>.exe.
- Observe, test and explore the application with the new version of Qt.