Building for iOS
- Setup
- Building and Running Your iOS Application with RhoStudio
- Build an iOS App with Xcode
- Building and Run on devices before iPhone4 and iPad
- Building iPhone Application from the Command Line
- Building the Application for the iOS Device
- Installing Your Application Package to Your iOS Device
- Building the application for the Apple App Store
- Publishing on the Apple App Store
- Differences building for iOS7+
- ARM v7 Issue
Setup
Follow the instructions for setting up the development environment for building iOS applications.
Building Remotely
Alternatively, you can create the device builds remotely with RhoMobile hosted builds. Refer to our remote build guide for more info.
SDK locations
The iOS SDK that is specified in your build.yml will need to be in the default XCode folder or the build process will not be able to find it.
Example:
iphone:
    SDK: iphoneos7.0
or
iphone:
    SDK: iphonesimulator7.0
With these SDKs specified, you need to make sure the SDKs are in the right folder. To find your default XCode installation directory, you can run the command xcode-select --print-path in your terminal. This will return something like this:
$ xcode-select --print-path
/Applications/Xcode.app/Contents/Developer
This is the path that the build process will use when looking for your iOS SDKs. If you have an SDK that you will be using but, it’s in another folder you’ll need to move it to the appropriate folder in this directory. For Example, if I have an iphoneos6.0 SDK that I want to use but it’s in my downloads folder, I’ll need to move it /Applications/Xcode.app/Contents/Developer/Platforms/iPhoneOS.platform/Developer/SDKs/.
The iphoneos and iphonesimulator SDKs go in two different folders:
-
/Applications/Xcode.app/Contents/Developer/Platforms/iPhoneOS.platform/Developer/SDKs- iPhoneOS SDKs, for running apps on your iOS device. -
/Applications/Xcode.app/Contents/Developer/Platforms/iPhoneSimulator.platform/Developer/SDKs- iPhoneSimulator SDKs, for running apps in your iOS simulator.
Note: These paths are solely for your information, they do not need to be copied into any files to be used. These are simply the directories in which you need to store your SDKs for them to work with the RhoMobile build process.
Building and Running Your iOS Application with RhoStudio
To start the build process, create a Run Configuration: select your project in the Project Explorer, and do one of the following actions.
- Select Run->Run Configurations… from the main menu,
- Or right-click on your project, and select Run As->Run Configurations from the popup menu.
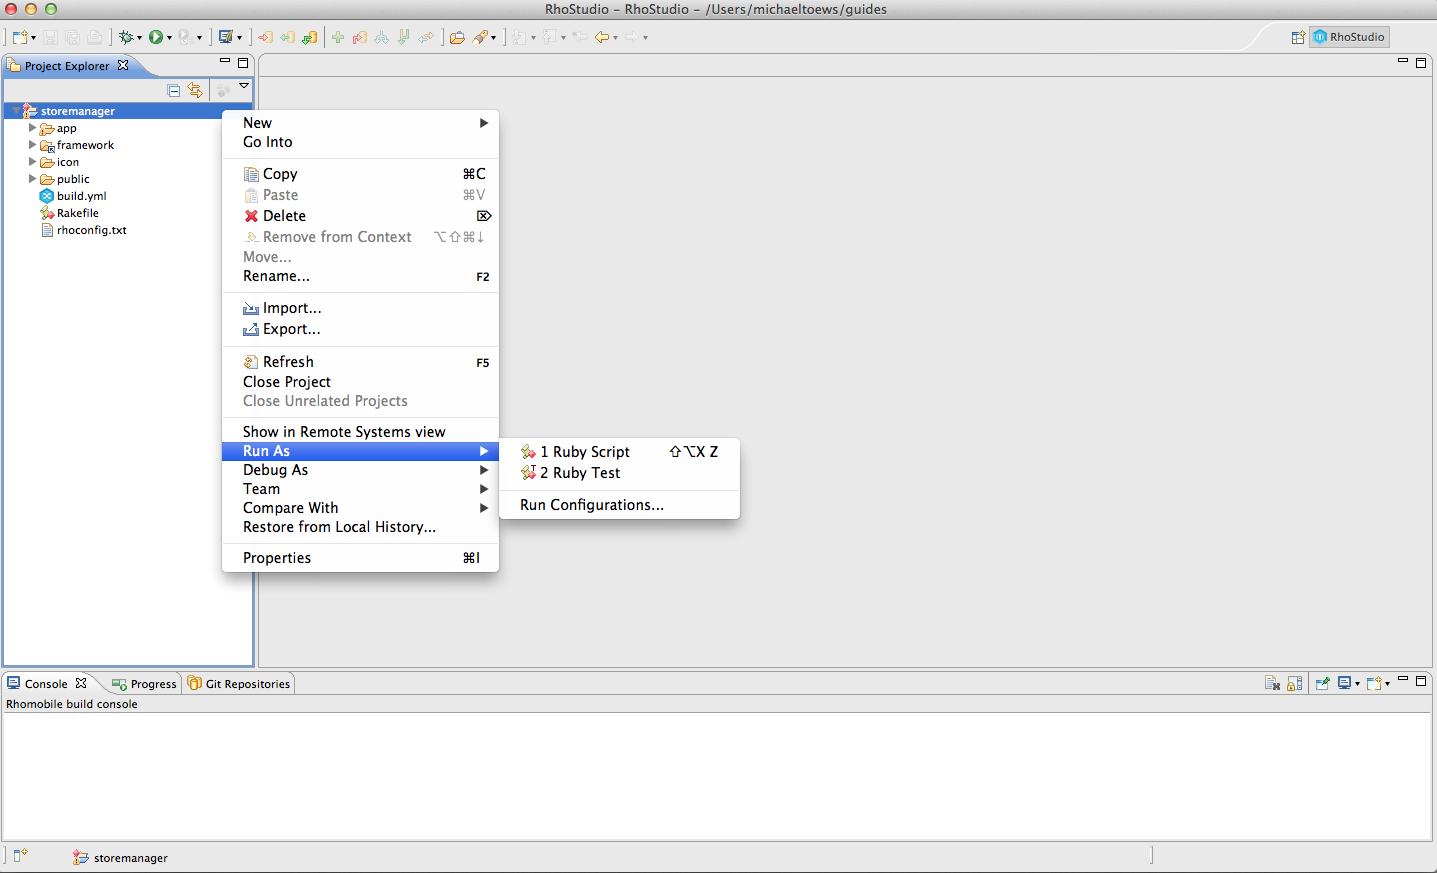
The Run Configurations window appears.
To run on the iOS simulator, select iPhone in Platform, Simulator in Simulator type, and select iPhone or iPad. Then click the Run button.

Build an iOS App with Xcode
Generating the XCode Project
If you wish to run your RhoMobile application on an iOS device, you need to build and run it using an Xcode project. There are two ways to do this:
Both from the command line:
- run the
run:iphonerake task
This will create the xcode project but will also run the app in the iphone simulator. :::term $ rake run:iphone
- run the
build:iphone:setup_xcode_projectrake task:
If you want to create the XCode project without running your app in the simulator, use this command instead. :::term $ rake build:iphone:setup_xcode_project
After the app has built, it will create an XCode project and place it in your project folder in the app’s root directory. e.g. <path to app>/project/iphone/<name of app>.xcodeproject.
Starting the Project in XCode
Then in XCode open the <path to app>/project/iphone/<name of app>.xcodeproject project.
In the Xcode Scheme menu, select the proper scheme before you build and run your project. Click on the Scheme menu.

Select the scheme rhorunner and what platform you would like to build to.

Now you can build and run in Xcode to run your project in the iOS simulator.
If you are an Apple developer, you can run your RhoMobile application on your iOS device. In Xcode, select your rhorunner target, click on the Build Settings tab, and see that your code signing information that you installed as an Apple developer is set up and selected.
You should see your app’s XCode project listed in the XCode window title. In the case below, my app’s name is build-ios-test and the .xcodeproject file is Buildiostest.xcodeproject.

Plug in your iOS device. In Xcode, under Scheme, select iOS device under rhorunner, then build and run.

For more information on running on your iOS device from Xcode, go to the Apple developer site, go to the iOS Developer Library, and search on “managing devices”, or “run applications on a device,” or similar.
You can edit your RhoMobile code for your RhoMobile application in a text editor, save your changes, do a Clean in Xcode so that your changes will register in Xcode, and then rebuild and run your project from Xcode.
The resulting application package (*.app) is located in your RhoMobile source code folder under /platform/iphone/build/, in a folder named like [Debug/Release]-[iphoneos/iphonesimulator]/rhorunner.app.
Note: After any modification to the build.yml file, you’ll want to regenerate the XCode project using the command
rake build:iphone:setup_xcode_project.
Changing rhorunner to match your app name
By default, the scheme name, product name, and target name are “rhorunner”. This is simply cosmetic at this point but you can change it if you like. To change these items:
Scheme Name
Click the name rhorunner as if to change the scheme. You’ll get a dropdown menu with the option “Manage schemes”. Click this and you’ll be presented with a list of schemes. Click the rhorunner scheme and either click it again or press the Enter key to rename it to your app’s name.
Product Name
In the middle pane of XCode, click the “Build Settings” option at the top. In the list of build settings you’ll find the heading “Packaging” and in this section, expand the “Product Name” item. You can then click on the name “rhorunner” to change this name to you app’s name.
Target Name
In the middle pane of XCode, click the drawer button to expand the drawer and reveal the “Project” and “Target” items. Just as before, you can single-click the highlighted “rhorunner” item to rename it to your app’s name.
Here are the pieces that can be renamed to match your app’s name:

Building and Run on devices before iPhone4 and iPad
From XCode 4.2 on, Apple removed default support of the armv6 architecture. In this case there are two issues.
Your distribution build should include code for both armv6 and armv7. The XCode projects included with RhoMobile and used for build RhoMobile-based applications for iOS are already fixed for this.
If you want to build/run/debug your application on devices before iPhone4/iPad (for example, on iPhone 3G), you should manually path all your native extension xcode projects used in your application for Architecture settings. In your project, under Build Settings -> Architectures, click the Debug or Release row (depending on if you are debugging or releasing), and choose “Other”. In the pop-up box, modify as follows.
- Remove
$(ARCHS_STANDARD_32_BIT)and replace by typingarmv6. - Use the plus button to add a new row. Type
armv7. - Click Done.
Building iPhone Application from the Command Line
Unlike building the application from the Xcode GUI, when you build the application from the command line, use the rake command from the directory of the application that you had just generated with the rhodes command.
From the command line, navigate to the folder for your RhoMobile application.
To run your RhoMobile application in the iPhone simulator, run this rake command:
$ rake run:iphone
Building the Application for the iOS Device
After you have modified and debugged your RhoMobile application, you can prepare your application to install to your iOS device.
Modifying the build.yml
First, in your application’s build.yml file, change sdk to iphoneos instead of iphonesimulator, configuration to Release instead of Debug, and add information such as codesignidentity.
iphone: sdk: iphoneos4.3 configuration: Release codesignidentity: “iPhone Developer” entitlements: “”
build.yml settings
The default build.yml settings generated for iphone are:
name: myapp version: 1.0 iphone: provisionprofile: sdk: iphonesimulator3.0 entitlements: codesignidentity: configuration: Debug emulator: 3.0 emulatortarget: iphone BundleIdentifier: com.yourcompany.yourapp BundleURLScheme: yourapp entitlements_file: “./production/Entitlements.plist” production: app_plist_title: “myapp” app_plist_subtitle: “myapp” app_plist_icon_url: “www.yourcompany.com/icon.png” app_plist_ipa_url: “www.yourcompany.com/myapp.ipa” ipa_itunesartwork_image: “./production/image.jpg”
- name: name of your application. Will show on screen (iPhone application bundle display name)
- version: version of your application. iPhone application bundle version
- provisionprofile: The UUID of your provisioning profile to use when signing.
- sdk: The version of sdk used to build. Typically iphonesimulatorX.X or iphoneosX.X
- entitlements: propertylist file for entitlements for your build. Typically is Entitlements.plist
- codesignidentity: The name of the code signing identity to use when signing for device.
- configuration: Debug/Release/Distribution
- emulator: version of emulator for run application
- emulatortarget: device family for simulator (iphone/ipad)
- BundleIdentifier: bundle identifier - used in provisioning profile
- BundleURLScheme: bundle URL scheme of your app (used for opening your application from another application by using custom URL scheme)
- entitlements_file: path of your custom Entitlements.plist (if you want use own instead of default) - you also can just put Entitlements.plist file into root folder of your application and it will be automatically used during build
- production: section used only for Ad Hoc distribution, contain some specific options for prepare .plist and *.ipa files etc.
- app_plist_title: title in plist file (application name by default)
- app_plist_subtitle: subtitle in plist file (application name by default)
- app_plist_icon_url: icon url written in plist file
- app_plist_ipa_url: IPA file url written in plist file
- ipa_itunesartwork_image: path to iTunesArtwork image included into IPA file (must be 512x512 JPG image)
** > Note: BundleIdentifier and BundleURLScheme can contain only next symbols : “a”-“z”, “A”-“Z”, “0”-“9”, “-”, “.” !
Here is an example of the iPhone settings in build.yml for a finished application:
name: JS App version: 1.0 iphone: provisionprofile: E5931D39-CA68-48E4-A3AF-BB538E1C8CE6 sdk: iphoneos4.2 codesignidentity: “iPhone Developer: John Smith (MF99RW67WY)” entitlements: “” configuration: Release emulator: 4.2 emulatortarget: ipad BundleIdentifier: com.johnsmithcompany.jsapp BundleURLScheme: jsapp
Creating Your Application Package
Now you can create your .app file with this rake command:
$ rake device:iphone:production
The package named your application name.app will be placed to <your application folder>/bin/target/iOS/[sdkname]/[configuration]/[your application name].app if you are using RhoMobile from 2.2.4 version.
Result package named rhorunner.app will be placed to <sdk directory>/platform/iphone/build/[Debug/Release/Distribution]-[iphoneos/iphonesimulator]/rhorunner.app if you are using RhoMobile before 2.2.4 version.
Installing Your Application Package to Your iOS Device
Use iTunes for installing your application package (your_application_name.app) to the iOS device:
- Open iTunes.
- Under Library, select Apps.
- Drag and drop your application package into the Apps screen.
- Connect your device to iTunes.
- Under Library, select your device.
- Select the Apps tab in your iTunes device screen.
- In the Sync Apps list, check your application.
- Perform a sync. Your application is installed to your device.
Building the application for the Apple App Store
After you have tested your RhoMobile application on your iOS device and tweaked it as required, you can prepare your application for publishing to the App Store.
Modifying the build.yml
Update your application’s build.yml file, change configuration to Distribution, and make sure sdk is set to to iphoneos and add information such as codesignidentity.
Here is an example of the iPhone settings in build.yml for distribution:
name: JS App
version: 1.0
iphone:
    provisionprofile: E5931D39-CA68-48E4-A3AF-BB538E1C8CE6
    sdk: iphoneos4.2
    codesignidentity: "iPhone Developer: John Smith (MF99RW67WY)"
    entitlements: ""
    configuration: Distribution
    BundleIdentifier: com.johnsmithcompany.jsapp
    BundleURLScheme: jsapp
Setting your application name, icons and loading screen
You will need to provide a name and icon for the application that the user will see on the device. You can also customize the loading screen that is shown while your application is launching. Refer to the Application Icon and Splash Screen guide for detailed information.
You must also include the following icon sizes for your app in order for it to pass App Store requirements:
- icon57
- icon60
- icon76
- icon72
- icon114
- icon120
- icon144
- icon152
- icon180
In addition to these, you need to also add icons for iTunes artwork images to be shown in iTunes and the AppStore application. Rhodes now generates iOS apps with the following image files:
- “iTunesArtwork” - 512x512 PNG
- “iTunesArtwork@2x” - 1024x1024 PNG
Simply put your images in place of these with the same names to customize the images.
Turn off developer options
Update your application’s configuration files to make sure developer / debug / profile options are turned off.
The below values can be used as a guide for rhoconfig.txt, skip any setting which is not already present.
MinSeverity  = 3
LogToOutput = 0
net_trace = 0
log_skip_post = 0
The below values can be used as a guide for build.yml, skip any setting which is not already present.
profiler: 0
Creating your application package
Once you have finished configuration, you can run:
$ rake device:iphone:production
The signed package named [app-name].app will be created in <app-dir>/bin/target/iOS/[sdkname]/Distribution/.
Publishing on the Apple App Store
When your application is ready to be distributed to other users, either for beta testing or for deployment, you have several options:
- Sending the application to users directly, also called Ad-Hoc distribution (for testing purposes only, some limitations apply)
- Uploading your application to the public App Store
- Distributing it under the iOS Enterprise Distribution program (for in-house use only)
All options require you to be enrolled in one of Apple’s iOS Developer Programs and to have created signing certificates. iOS code signing and certificate management are often a stumbling block for newcomers to the platform; refer to About App Distribution and read the instructions carefully.
Ad-Hoc distribution
For application testing purposes, Apple allows you to designate up to 100 devices that will be able to install your application. When you have the devices signed up in iTunes Connect (Apple’s app management portal), create a distribution certificate and ad-hoc provisioning profile. Together, these two files allow you to digitally sign your application and install it on the registered devices.
See the section called Beta Testing Your iOS App in Apple’s documentation for the details.
Getting a distribution provisioning profile
You need a “distribution provisioning profile” to sign your application before it can be submitted to the App Store. See Creating Store Provisioning Profiles for steps to create and download a distribution provisioning profile.
Prepare for App Review
To ensure that your application passes the app store approval process go through the Guidelines carefully.
Many applications can benefit from using native UI elements, like the native tab bar, to better integrate with the rest of the platform. There are plenty of RhoMobile applications on the App Store available already; in general, if your application follows the iOS Human Interface guidelines and does not otherwise violate any App Store rule, it will be accepted.
Submitting your application
When you are ready to submit your application, you can do it using XCode or using Application Loader
Once your application is submitted successfully you can view its review status by referring to these steps.
Differences building for iOS7+
System Status Bar
In iOS7, the system status bar does not have a size and does not shift the application window down, because it is transparent and always drawn over the application window. This can be an issue for older applications because the system status bar is drawn over the WebView content located at the top.
To resolve this issue we reserve some room at the top of the application (with a gray color fill) and shift the WebView down, as with the old status bar. In this case all applications using an SDK older that iOS7 will work without content placing/showing issues.
If you want to use the whole space for the WebView you can use the following special build.yml parameter which works only for applications using the iOS 7.0 S
To enable the new iOS7 look for the status bar, simply add iphone_use_new_ios7_status_bar_style: 1 to your build.yml file.


Native Toolbar
Background Color
iOS7's new Toolbar has a flat design. You can setup only background color and color for icons (new iOS7 feature). Options for background color the same with old API; integer value. Example for Ruby hash: `Rho::NativeToolbar.create(:buttons => toolbar, :background_color => 0xFFFF00)`Icon Color
The new option for icon color is alos an integer value. This only works for applications using the iOS7 SDK. Example for Ruby hash: `Rho::NativeToolbar.create(toolbar, :iOS7IconColor => 0xFFFF00)`
Colored Icon Flag
The colored icon flag is still working as it did in earlier versions RhoElements.Native Tabbar
Background Color
Options for background color are the same as with the previous Rhodes API: integer value. Example for Ruby hash:`:background_color => 0x00004F`Icon Color
New options for selected icon color: integer value. This works only for applications usinf the iOS7 SDK. Example for Ruby hash :`:iOS7SelectedColor => 0xFFFF00`Loading Splash Screen
Newer iPhones (iPhone 5 and up) have larger screen (longer screen), so applications that want to use whole screen should have a special loading splash screen image - loading-568h@2x.png with 640 x 1136 size. Only applications with this loading image use the whole screen. Other applications that detect that the device is older that iPhone 5 should start with reduced screen size splash which is appropriate for that device, most likely equal to old phones' resolution, 640x960.
ARM v7 Issue
Any RhoMobile app originally built with 4.1 and then later rebuilt with 5.1 to target Apple iPhone 5, 5C or other Apple devices that incorporate the ARM v7 instruction set, might return the error:
“Undefined symbols for architecture armv7 lD: symbol(s) not found for architecture armv7”
Although support for the ARMv7 architecture was implemented in RMS 5.1, apps built with previous versions contain incompatible components that will cause the app to fail when rebuilt.
To solve the problem:
- Delete the project and bin folders under the app folder of the project in question
- Perform a clean build of the app