Near Field Communications With Rhodes
This tutorial will guide you through running near field communications with Rhodes. Near field communication is very similar to RFID, and you can even use near field communications to read RFID tags. It has features to have two devices communicate with each other, as well as act as mobile business cards.
As of Rhodes version 3.3.3, the NFC API is removed from Rhodes. This feature is only supported in Zebra RhoMobile Suite. If you wish to use this feature, you will need to upgrade to RhoMobile Suite. Your application’s build.yml will also need to be modified to indicate the application type is ‘Rhoelements’. Additionally, a RhoElements license is required.
- Source Code
- Webinar Video
- Pre-requisite Reading
- Setup
- Preparing the NFCDemo Project to Send NFC Tags
- Running the NFCDemo Project
- Preparing the Rhodes Project to Receive NFC Tags
- Examining the Rhodes NFC Application Code for Receiving Tags
Source Code
The source code for this example is located here.
Webinar Video
Pre-requisite Reading
Setup
This tutorial assumes that you know how to edit a Rhodes application, and that you have the Android SDK installed and paths set in your profile to your Android SDK and its tools folder. It also assumes that you have the correct version of the Android SDK installed: Google APIs:10 (which is based on Android 2.3.3), and that you created an AVD (Android Virtual Device) for that version of Android. If you do not know how to do this, see Pre-requisite Reading.
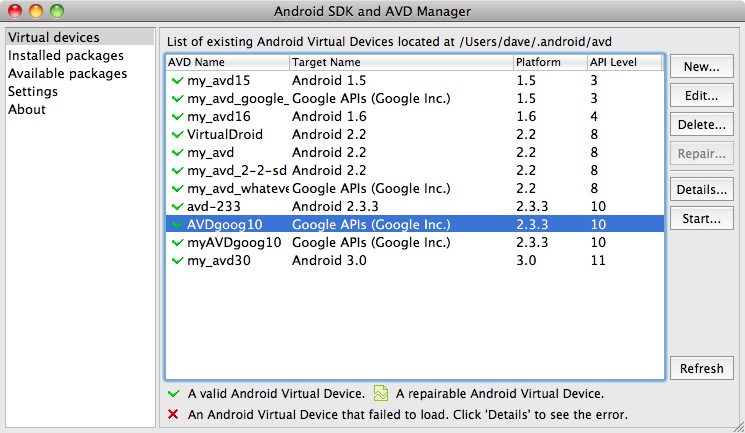
If you have the Android SDK installed, you can check to see if it has Google APIs:10. Go to your tools folder in your Android SDK and run android. In the Android SDK and AVD Manager, click Installed packages. If you do not see Google APIs:10 in the list of installed packages, click on Available Packages, find Google APIs by Google Inc, Android API 10, and install it. Also click Virtual Devices and check that you have an AVD (Android Virtual Device) set up for this version of Android; create one if you do not.
The webinar and this tutorial show Android running from the command line, outside of Eclipse.
In the Build for Android section of Build Rhodes Application, you set a path to your Android SDK. Since you will run the adb command from the NFCDemo folder, you should set a path to adb in your profile. For example, on the Macintosh, in .bash_profile, you set a path to the Android SDK platform-tools folder.
Preparing the NFCDemo Project to Send NFC Tags
Before you build and run the NFCDemo project, you need to make some changes to its code. The NFCDemo project is currently a self-contained application; it has a reader and a writer. You will modify the project to work with a Rhodes application, so that it just sends out a message, allowing the Rhodes application to listen for that message.
Building the NFCDemo Project
Navigate to the location of your Android SDK. For example, people who installed the SDK into their Eclipse on a Macintosh might navigate to /Applications/eclipse/android-sdk-mac_86.
Within your Android SDK folder, navigate to /samples/android-10/NFCDemo.
$ cd samples/android-10/NFCDemo
Check the lists of Android targets that you have.
$ android list targets
This will show you a list of all the Android versions you have. You want Google APIs:10 (which is based on Android 2.3.3). It will look like this:
id: 20 or "Google Inc.:Google APIs:10"
     Name: Google APIs
     Type: Add-On
     Vendor: Google Inc.
     Revision: 1
     Description: Android + Google APIs
     Based on Android 2.3.3 (API level 10)
     Libraries:
      * com.google.android.maps (maps.jar)
          API for Google Maps
     Skins: WVGA854, WQVGA400, HVGA, WQVGA432, WVGA800 (default), QVGA
Now run the Android command to generate the build scripts for the NFCDemo project. Set the -t parameter to the id number for your Android with Google APIs level 10 or higher; the id is 20 in the above example. Set the -p parameter to the path to your Android SDK, samples folder, Android Google APIs level 10 folder, NFCDemo project.
$ android update project -s -n "NFC Demo" -t 20 -p /Applications/eclipse2/android-sdk-mac_86/samples/android-10/NFCDemo
Run ant debug to try to build the application.
$ ant debug
Installing the Java libraries into NFCDemo
You will get a bunch of errors because you also need some Java libraries for the NFCDemo project to work. Go to code.google.com/p/guava-libraries. Click downloads, and download the latest zip file, which is named something like guava-r09.zip. Unzip the file and copy the jar file (in this example, guava-r09.jar) into your libs folder in the NFCDemo project. (Since this libs folder is generated with the build command, you had to try to build and fail, then you have the libs folder into which you copy the guava jar file.)
Coding the NFCDemo Project to Send NFC Tags on a Timer
Open the NFCDemo project in your text editor to edit its Android example that sends out fake NFC tags. In NFCDemo/src/com/example/android/nfc/simulator/FakeTagsActivity.java, edit the onListItemClick method. You will edit the code so it no longer sends the tag to its own application, but instead it sends out that broadcast message on a time period, giving you time to open your Rhodes application to see it receive the tag.
Add the imports for Timer and TimerTask.
import java.util.Timer;
import java.util.TimerTask;
Comment out the code for getItem and startActivity.
@Override
public void onListItemClick(ListView l, View v, int position, long id) {
/*  This is the original code, now commented out.
    final TagDescription description = mAdapter.getItem(position);
    final Intent intent = new Intent(NfcAdapter.ACTION_TAG_DISCOVERED);
    intent.putExtra(NfcAdapter.EXTRA_NDEF_MESSAGES, description.msgs);
    startActivity(intent);
*/
Add code for Timer and TimerTask. You need a timer to delay from when you have the NFCDemo application send an NFC tag, and you switch to the Rhodes application and see it receive the NFC tag.
final int pos = position;     /* save the position */
Timer timer = new Timer();
timer.schedule( new TimerTask() {
/* Instead of startActivity, sendBroadcast sends the activity 15 seconds after you click the button so we have time to switch to the Rhodes application that picks up the broadcast. */
  private int ppos = pos;
  public void run() {
    TagDescription description = mAdapter.getItem(ppos);
    Intent intent_tmp = new Intent(NfcAdapter.ACTION_TAG_DISCOVERED);
    intent_tmp.putExtra(NfcAdapter.EXTRA_NDEF_MESSAGES, description.msgs);
    sendBroadcast(intent_tmp, null);
  }
}, 15000);
Running the NFCDemo Project
Now that you have modified the NFCDemo project, run ant debug to build the application.
$ ant debug
Running the Android Emulator
Run your Android emulator: android in your tools folder within your Android SDK installation folder.
In the webinar video, the emulator is running at 8:10, where the Android SDK and AVD Manager is set up to run an AVD for Android with Google APIs level 10 or above, which is the minimum required for near field communication. Run that AVD.
Installing NFCDemo into the Android Emulator
Now install your NFCDemo app into the Android emulator that you are running. From the command line, within your NFCDemo folder:
$ adb install bin/NFC\ Demo-debug.apk
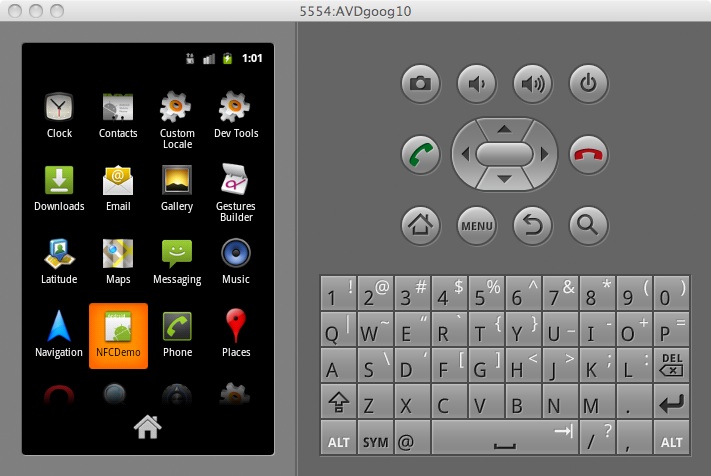
In the Android emulator, the NFCDemo app should be running (9:09 in the webinar video). The NFCDemo app lets you generate NFC tags that you can receive in a Rhodes Android application.
Preparing the Rhodes Project to Receive NFC Tags
The Rhodes system API samples project has several applications, one of which is called NFC. Copy the Rhodes system API samples project to your local computer; you will be using the NFC code.
Checking the Rhodes Application for NFC
Open the rhodes-system-api-samples project in your text editor. In the build.yml file, make sure that your android section has the nfc extension, and that the version is at least 2.3.3. Here is an example.
android:
  extensions:
  - barcode
  - rainbow
  - nfc
  capabilities:
  - network_state
  - sdcard
  mapping: true
  version: 2.3.3
Building the Rhodes NFC Application
From the rhodes-system-api-samples project folder, enter the command to run this project.
$ rake run:Android
The first time you build the rhodes-system-api-samples project, it will take several minutes to build because this project includes all the Rhodes extensions and has to build them.
Running the Rhodes NFC Application in the Background
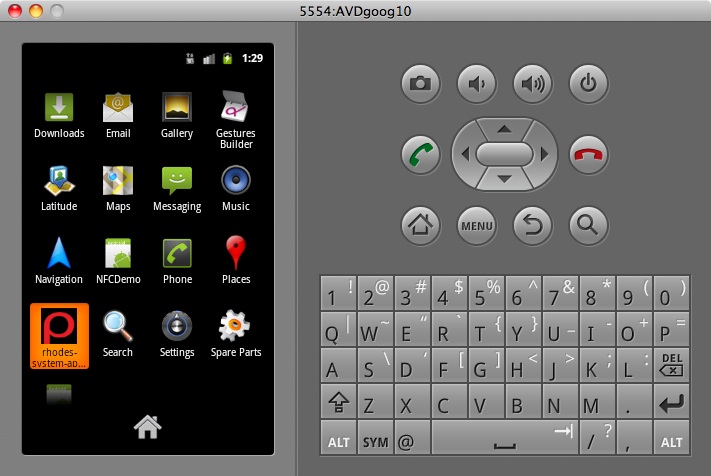
The Android emulator appears, and it will be running the rhodes-system-api-samples application. Click Menu and close the application. You do this because when you launch the rhodes-system-api-samples application from the command line, and then you press the Home button in the emulator, the application exits. But you want to have the application running in the background, ready to have a message pushed to it (this application is registered for push messages).
Run rhodes-system-api-samples again by clicking on it within the emulator.
In the rhodes-system-api-samples application tasklist, select NFC (Near Field Communication).
Now when you click the Home button, the application goes into the background. But do not click Home yet; you will set up some logging information first.
Getting the Log Information from the Rhodes NFC Application
From the command line, enter the following command to see all the log information from the rhodes-system-api-samples application.
$ adb logcat
Listening for NFC Tags with the Rhodes NFC Application
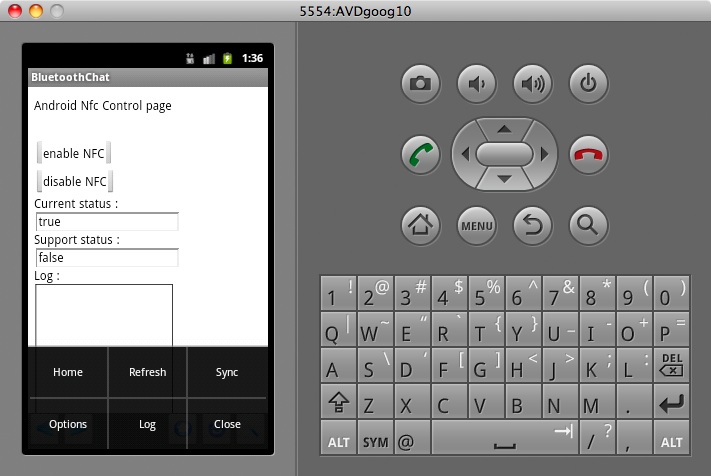
The rhodes-system-api-samples application has a simple control page, showing the button to enable and disable NFC, and the status and the log.
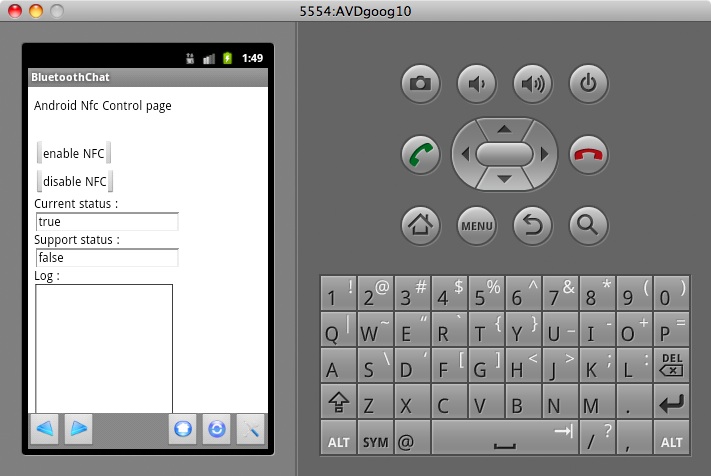
Click the enable NFC button on the control page to start listening. Since logcat is running, you will see on the command line that the enable is executed. Select the Home button to put the rhodes-system-api-samples application into the background.
Sending an NFC Tag with the NFCDemo Application
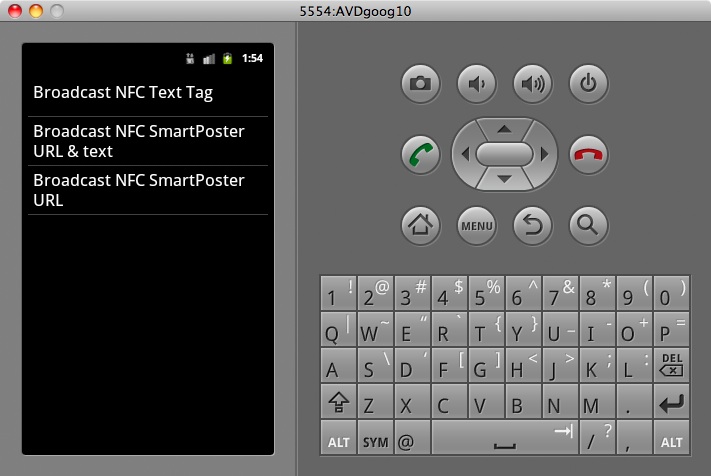
Click on the NFCDemo application in the emulator to run it. You will see choices for the types of NFC tags that you can broadcast. Select NFC SmartPoster URL & text.
Receiving the NFC Tag with the Rhodes Application
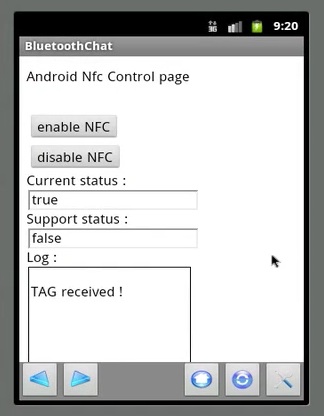
Now you have 15 seconds to click Home, go back to the rhodes-system-api-samples application and click on it, and then click on its enable NFC button. In the Log window on the rhodes-system-api-samples application, you see “TAG received!”.
Examining the NFC Tag
At the command line, you see more detailed information about the received tag. We have the callback: /app/Nfc/nfc_callback. In the callback, we decode the message. You can see the records in the tag, such as the following:
Record :
    tnf = TNF_WELL_KNOWN
    type = RTD_TEXT
    payload_as_string = google
Record :
    tnf = TNF_WELL_KNOWN
    type = RTD_URI
    payload_as_string = http://www.google.com
Sending and Receiving Another NFC Tag
We can do this again. Go to the NFCDemo application, and this time click on Broadcast NFC Text Tag. Then click Home, go back to the rhodes-system-api-samples application and click on it, then click on the enable NFC button. In the Log, we see that another tag is received.
At the command line, we see that this is a simple text tag.
Record :
    tnf = TNF_WELL_KNOWN
    type = RTD_TEXT
    payload_as_string = Some random english text.
Examining the Rhodes NFC Application Code for Receiving Tags
Let’s take a look at the rhodes-system-api-samples project and see how this is done.
Understanding the Rhodes NFC Application Control Page
Open the Nfc model: app/Nfc/controller.rb. The code below from the controller checks if the NFC is enabled, and if it is supported. And when the application receives a tag, the set_nfc_callback is called, and the callback is set to the nfc_callback action. Since this is the index, it renders the index page for this application. Note that in the status page for this application, it has the enable NFC and disable NFC buttons, and it shows the Current status and Support status.
def index
  $status = Rho::NFCManager.is_enabled.to_s       # Current status display
  $supported = Rho::NFCManager.is_supported.to_s  # Support status display
  $log = ''
  # Set callback to do the nfc_callback.
  Rho::NFCManager.set_nfc_callback(url_for(:action => :nfc_callback))
  puts 'NfcController.index'
  render
end
Setting the Status for NFC Enable/Disable
When the enable NFC or disable NFC buttons are clicked, the status is set with some JavaScript. set_status executes JavaScript that is an AJAX updater for the status fields.
def set_status(status)
  WebView.execute_js('setStatus("'+status+'");')   # AJAX updater
end

def do_enable
  Rho::NFCManager.enable                       # enable NFC button
  $status = Rho::NFCManager.is_enabled.to_s
  set_status($status)                          # execute JavaScript
end

def do_disable
  Rho::NFCManager.disable                      # disable NFC button
  $status = Rho::NFCManager.is_enabled.to_s
  set_status($status)                          # execute JavaScript
end
Do the Callback on NFC Enable
When NFC is enabled, do the nfc_callback action. For each message, add “TAG Received!” to the Log window in the application control page, then decode the message. Set the indent for the message, then call print_message.
def nfc_callback
  puts 'NfcController.nfc_callback START'
  messages = @params['messages']
  add_to_log('TAG received !')   # add the message to the Log

  puts 'NFC Messages :'
  messages.each do |m|
        print_message($offset_step, m)   # set how indented the message is
  end

  set_log($log)
  puts 'NfcController.nfc_callback FINISH'
end
Print the NFC Message
In print_message, finds all the records in the message and calls print_record to print out each record individually (you see these messages at the command line because you ran adb logcat). In print_record, you can see the record type: convert_Tnf_to_string for Tnf records, and convert_RTD_to_string for RTD records. Or if you have a simple payload string, you have that string. And you loop through the subrecords and execute print message for them with offsets.
def print_record(offset, record)
  puts offset+'Record :'
  puts offset+$offset_step+'tnf = '+Rho::NFCManager.convert_Tnf_to_string(record['tnf'])
  puts offset+$offset_step+'type = '+Rho::NFCManager.convert_RTD_to_string(record['type'])
  puts offset+$offset_step+'payload_as_string = '+record['payload_as_string']
  subrecords = record['subrecords']
  if subrecords != nil
       puts offset+$offset_step+'Subrecords :'
       print_message(offset+$offset_step+$offset_step, subrecords)
  end
end

def print_message(offset, message)
    puts offset+'Message :'
    records = message['records']
    puts offset+$offset_step+'Records :'
    # print out each record in the message.
    records.each do |r|
        print_record(offset+$offset_step+$offset_step, r)
    end
end
Reading the NFC Message
For example, the terminal showed the results of clicking NFC SmartPoster URL & text in the NFCDemo application. We have the strings for the type (RTD_SMART_POSTER). There was no payload. There was a subrecord that contains another message with two records, a TNF_WELL_KNOWN RTD_TEXT (Google), and a TNF_WELL_KNOWN RTD_URI (http://www.google.com).
Message :
    Records :
        Record :
            tnf = TNF_WELL_KNOWN
            type = RTD_SMART_POSTER
            payload_as_string =
            Subrecords :
                Message :
                    Record :
                        tnf = TNF_WELL_KNOWN
                        type = RTD_TEXT
                        payload_as_string = google
                    Record :
                        tnf = TNF_WELL_KNOWN
                        type = RTD_URI
                        payload_as_string = http://www.google.com
If you click the Broadcast NFC Text Tag in NFCDemo, you see that its tag has one record.
Message :
    Records :
        Record :
            tnf = TNF_WELL_KNOWN
            type = RTD_TEXT
            payload_as_string = Some random english text.