Build for Android
- Setup
- Set up minimal Android SDK API level
- Device capabilities settings in build.yml
- Customizing application’s AndroidManifest.xml
- Building and Running Your Android Application with RhoStudio
- Building and Running Your Android Application from the Command Line
- Building an Android Production Version
- Installing Your Application Package to Your Android Device
- Publishing on Google Play
- Publishing on other Android marketplaces
- Using Linux
- Getting application log from device or emulator
- Remarks
Setup
Follow the instructions for setting up the development environment for building Android applications.
Building Remotely
Alternatively, you can create the device builds remotely with RhoMobile hosted builds. Refer to our remote build guide for more info.
Set up minimal Android SDK API level
The minimal API level supported by Rhodes is 4 (Android 1.6) You can set a greater minimal API level in build.yml. For example, the following entry will restrict installing your application on any Android OS prior to 3.0:
android:
    minSDK: 11
Device capabilities settings in build.yml
On Android, you must specify your device capabilities the your application will use. By default, these capabilities are NOT enabled.
In RhoStudio, you can double-click on your application’s build.yml file, then click the Rhobuild setting tab, then click the Capabilities: Add button. You will see a list of capabilities you can check to activate for your application.

You can also edit the build.yml file directly with a text editor. Here is a list of capabilities you can add to the capabilities section in your application build.yml file.
audio
camera
gps
network_state
phone
pim
record_audio
vibrate
bluetooth
calendar
sdcard
push
hardware_acceleration
Customizing application’s AndroidManifest.xml
If you have an urgent need to put changes in AndroidManifest.xml that are not supported by build settings, you may edit a manifest template located at
Note: To see how to change AndroidManifest.xml at extension build, see Extending the Rhodes Framework.
You can also specify an android manifest file for your app in particular by specifying a path to the template in your build.yml file.
For Example:
android:
    manifest_template: path/to/template.erb
Building and Running Your Android Application with RhoStudio
To start the build process, create a Run Configuration: select your project in the Project Explorer, and either: * select Run->Run Configurations… from the main menu, * or right-click on your project, and select Run As->Run Configurations from the popup menu.
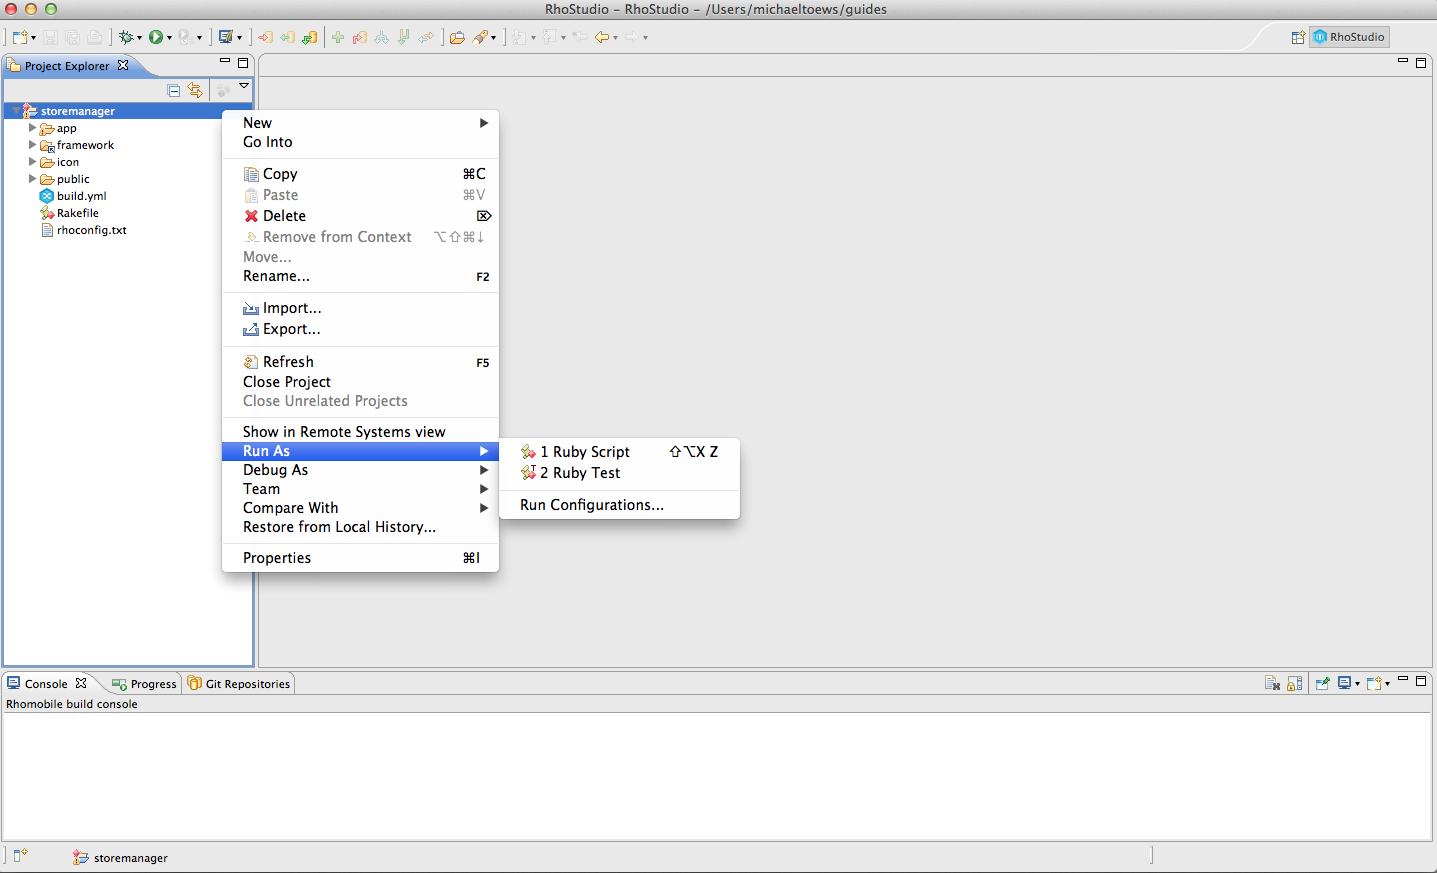
The Run Configurations window appears.
Running on the Android Simulator with RhoStudio
To run on the Android simulator, select Android in Platform, Simulator in Simulator type, and enter the name of the AVD in AVD name. Then click the Run button.

You can get a list of the AVD names by running the SDK setup: on Macintosh and Linux, navigate to and run

Note: You must install versions of the Android emulator that correspond to the version of Android that you set in your build.yml. For instance, if you set your Android version to 4.4.2 as such: :::yml android: version: 4.4.2 You must have the 4.4.2 emulator installed or the app will not run properly or may not run at all.
Running on an Android Device with RhoStudio
To run on an Android device, first set up your device as shown in the Android documentation for Using Hardware Devices.
Then connect your Android device to your computer with a USB cable.
In the Run Configurations window, select Android in Platform, and Device in Simulator type.
Reading the Log File with RhoStudio
After you run your application in RhoStudio, your application log file, rholog.txt, is stored in your application directory. You can open and read rholog.txt in RhoStudio by double-clicking on it in the Project Explorer.
Building and Running Your Android Application from the Command Line
From the command line, navigate to your application directory.
To run your application in the Android emulator, run the following command:
$ rake run:android
You can adjust the settings of the Android emulator from your application’s build.yml file. For example, to specify the platform version number and the emulator AVD name:
android:
    version: 2.1
    emulator: myDeviceEmulator20
You can also disable the Android title in the application and set the orientation to portrait (or landscape):
android:
    android_title: 0
    orientation: portrait
If the rake command gets stuck, you can kill the command window, open another window, and run:
$ adb start-server
$ rake run:android
Note: If you didn’t run your Android simulator yet or don’t have AVD configuration set, you will be asked a few questions about emulator configuration. You should answer “yes” for most questions or use default answers. As a result new AVD configuration will be created.
To uninstall your application from the emulator, run:
$ rake uninstall:android
To run on an Android device, first set up your device as shown in the Android documentation for Using Hardware Devices.
Connect your Android to your computer with a USB cable. You can verify that your device is connected by executing:
$ adb devices
If connected, you’ll see the device name listed. If your computer doesn’t see the device, try killing the adb process first:
$ adb kill-server
$ adb install <filename>.apk
After you have your device connected, navigate to your application directory and run:
$ rake run:android:device
This will build your application and sign it with auto-generated self-signed certificate.
To uninstall your application from the device, run:
$ rake uninstall:android:device
Building an Android Production Version
Modifying the build.yml
To build a production version of your application, edit your application’s build.yml as below:
android:
    production:
        certificate: path/to/your/developer/certificate
        password: "password-of-the-certificate"
        alias: "keystore.alias"
This will use the specified certificate to sign your application. If the certificate is not found, it will be auto-generated, and you’ll be prompted with several questions like your name, organization etc. The path to the certificate may be absolute or relative to your app directory. If you don’t want to use an auto-generated certificate, refer to the these instructions on how to create a certificate manually.
Setting your application name, icon and loading screen
You will need to provide a name and icon for the application that the user will see on the device. You can also customize the loading screen that is shown while your application is launching. Refer to the Application Icon and Splash Screen guide for detailed information.
You can refer to the recommended icon guidelines.
Turn off developer options
Update your application’s configuration files to make sure developer / debug / profile options are turned off.
The below values can be used as a guide for rhoconfig.txt, skip any setting which is not already present.
MinSeverity  = 3
LogToOutput = 0
net_trace = 0
log_skip_post = 0
The below values can be used as a guide for build.yml, skip any setting which is not already present.
profiler: 0
Creating your application package
Once your configuration is set up, you can run:
$ rake device:android:production
The signed APK will be located in <rhodes-app-dir>/bin/target.
Installing Your Application Package to Your Android Device
To install the application on the device run:
$ adb -d install -r <rhodes-app-dir>/bin/target/<app-name>_signed.apk
Publishing on Google Play
Getting a Google Play publisher account
To publish your application on Google Play you need a publisher account. Visit the Google Play Developer Console to create one.
Getting a Google Wallet Merchant account
If you want to sell your application on Google Play, you will also need to set up a Merchant Account.
To setup a merchant account:
- Login to the Developer Console
- Goto ‘Financial reports’ and then click on ‘Setup a Merchant Account now’.
Uploading and Publishing your application
The Google Play Launch Checklist has detailed steps needed to publish your application.
Below is a short summary of the steps to be done on the Developer Console:
- Choose the content rating for your application
- Choose the countries for distribution
- Choose the compatible devices for your application
- Choose your pricing (or free)
- Add screenshots, video, license agreement, etc.
- Uploading the APK
- Complete the application’s product details
- Publish
Refer to the Google Play developer console documentation for more information and step-by-step instructions.
Publishing on other Android marketplaces
Because Android is an open platform, you are not limited to publishing only on the Google Play store: you can also distribute your .apk packages directly to end-users as a download, or sign up for alternative marketplaces such as the Amazon Appstore for Android (Developer reference documentation)
Using Linux
On Macintosh and Windows computers, you can create RhoMobile apps within RhoStudio. However, on Linux installations, you can use Eclipse, since RhoStudio is not available for Linux.
Create a new workspace in the following directory: <Rhodes>/platform/android
In Eclipse, open Window > Preferences.
Click on Android node in the tree and specify the file path to the installed Android SDK (for example: ~/android-sdk).
Import all projects from the directory for your new workspace: <Rhodes>/platform/android
If you have set the option to build sources automatically, your project will be compiled just after the import.
Select Properties from the RhoMobile project context menu and select one of the latest Google API targets for Android.
Check the bin directory. You should see the Rhodes.apk file that was created. It will be signed with the debug key provided with SDK.
Now you are ready to install your application on your device and/or emulator.
In case of troubles in Eclipse while setting up the Android SDK and target, try “Rhodes project context menu” > “Android Tools” > “Fix Project Properties”.
It is possible your application has stopped unexpectedly just after the first build. In this case try to copy auto-generated java source files from the application folder
Getting application log from device or emulator
To see all emulator messages, run ‘adb logcat’ and start application on emulator.
To see all device messages, run ‘adb -d logcat’ and start application on device.
Remarks
SDCard Access
Extensions which came from RhoElements (i.e. AudioCapture) that could possibly write files to external storage will require “write SD card” permissions as part of the extension’s AndroidManifest. You cannot remove the ability to write to the SD card as it would cause the extension to malfunction. Therefore, the capability has already been granted on build, and any capability added by you will be ignored. This being the case, the following extensions will always be able to write to the SD card by default:
- AudioCapture
- MediaCapture
Supported Icons
The android build script supports icons for different screen density. To use this feature .png icons with exact size suffix should be added to <app>/icon folder.
Next icon file names are supported:
- icon.png - remains as default icon resource
- icon36.png - LDPI screen density icon.
- icon48.png - MDPI
- icon72.png - HDPI
- icon96.png - XHDPI
- icon144.png - XXHDPI
- icon192.png - XXXHDPI
The suffix means recommended icon dimension in pixels and it is allowed to have slightly different size. In other words in icon36.png can actually be an image with size 32x32 or even 72x72.